|
|
 |
|
W i n t e r t i m e P i c t u r e T a k i n g
|
 These web-pages have been scanned and converted from the "Eastman Kodak Company" publication "Wintertime Picture Taking" 1948-1949 edition. It contains information on how to take good pictures under cold circumstances and how to treat your camera equipment in order to prevent problems.
The original publication had perforation on the side so it could be put in a binder. As it said in the booklet:
This punching provides convenient means of insertion in the Kodak Photographic Notebook. See your dealer.
I do own some more publications from this series and will add more to the website when time permits.
|
Contents
- INTRODUCTION
- HOW TO TAKE GOOD SNOW PICTURES
- ABOVE ZERO WEATHER
- Taking Snapshots Just Outside the House
- Winter Sports, Field Trips, and Excursions
- Before You Go - Your Camera
- Reasons for Using a Filter - The Film - Going Indoors
- BELOW ZERO WEATHER
- Occasional Snapshots
- Winter Sports, Field Trips, and Excursions
- Tests and Preparations - You - Your Camera
- The Film
- Batteries - Straps and Cases
- Getting Ready to Go
- Out in the Cold
- Taking the Picture
- Reloading - If the Camera Gets Cold
- Going Back Indoors - If You Plan Going Out Again
- If You Plan to Take Pictures Indoors
- SPECIAL INFORMATION
- SELECTED REFERENCES
- EXPOSURE DATA FOR KODACHROME FILM
- KODAK SKYLIGHT FILTER
- EXPOSURE DATA FOR KODACOLOR ROLL FILM
- EXPOSURE DATA FOR KODAK BLACK-AND-WHITE FILMS
- KODAK FILTERS FOR BLACK-AND-WHITE SNOW PICTURES
|
Wintertime Picture Taking
Winter is a time full of picture-taking opportunities. From the day that snow first whitens the great outdoors, till the time when the last shrinking drift melts into the warming earth, winter presents excitement, activity, beauty, and a challenge to the picture taker.
You may recognize this challenge, yet hesitate to expose your camera and other photographic equipment to the cold, the wind, and the snow. You need not be so wary. When the urge comes to follow a picture out into the winter weather, a few simple precautions will protect your equipment and make your cold-weather picture taking what it should be easy, practical, enjoyable, and richly rewarding.
Copyright 1948 and 1949, Eastman Kodak Company T.M. Reg. U.S. Pat. Off.
HOW TO TAKE GOOD SNOW PICTURES
The best kind of a day for taking snow pictures is a bright, sunny, clear one. If you want to get good snow pictures either in black-and-white or in color, take them on bright, clear, or nearly clear days and stand with your camera so that the scene and the snow are lighted from the side. This way, the snow texture will be most visible. You can also obtain dramatic effects if you face the sun so that the snow is lighted from the back. When taking back-lighted pictures, shield your camera lens to prevent flare. A Kodak Lens Hood is an effective shield, but use your hand rather than use nothing. If you are making either black-and-white or color snapshots of children at play, stand with the sun at your back, that is, with the children front-lighted; you will get a picture in which the snow may not sparkle but in which more detail will show in the children's faces.
When determining exposures for snow scenes, set a Snapshot Kodaguide on "Bright Subject." If you use an exposure meter, don't accept the readings without asking yourself if they are reasonable. No meter will give you a correct reading if incorrectly used, and with some meters, taking a correct reading requires skill. The reading should always be taken close to the person whose picture you are taking, or to the principal object in the scene.
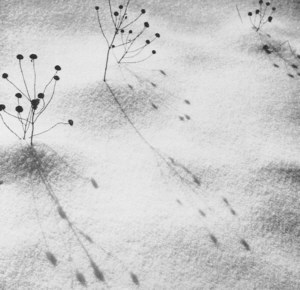
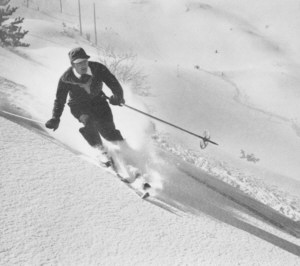
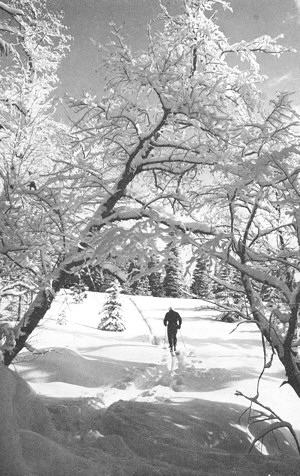
Back Lighting Emphasizes Snow Texture, Puts the Shadows to Work
Use these rules as guides: For a general snow scene without people in the foreground on a clear, sunny day, exposures for Kodachrome Film should not be less than 1/50 second at f/8, except when the snow is covered with a new glistening crust. Even then, only a back-lighted scene should call for an exposure as small as 1/50 second at f/11. You will be about right if you shoot side-lighted snow scenes at 1/50 second at f/8, and open up a half stop more if near-by people are included. Exposures for similar scenes on either Kodak Plus-X or Verichrome Film should rarely be less than 1/50 second at f/16, opening up to f/11 for people close by.
When you take skiing or tobogganing pictures, in which you want to show the steepness of the slope, the best position from which you call show the steepness is not the top, not the bottom, but some point on a near-by slope from which you get a side view.
Both Subject and Snow Look Well in a Side-Lighted Snow Scene
Color Pictures in Snow
Snowtime is especially well suited to color picture taking. In fact, many beautiful Kodachrome transparencies are made of all types of subjects out in the snow. Whether you use Kodachrome or Kodacolor Film, snow makes fine quality possible. Light striking it is reflected hack into the shadows of a scene, making those shadows softer and lighter in tone. Soft shadows make for good color pictures.
As in black-and-white picture taking the important rules are:
- Shoot in sunlight. Snow in pictures taken without sunlight is drab.
- Use side or back lighting because except for close-up portraits, front lighting is usually too flat.
To these two rules, add two more for color:
- For cool or neutral rendering, shoot when the sun is well above the horizon (after 9 and before 3 p.m.). Later or earlier in the day, the rendering is warm, sometimes pleasingly so. Alpenglow on snow-clad mountains is strikingly beautiful.
- Remember that sun-cast shadows on snow under a blue sky are blue and it is natural for them to appear blue in a color photograph of the scene. If, however, you're shooting Kodachrome Film and you want to reduce the bluishness of shadows somewhat, use the Kodak Skylight Filter. With Kodacolor Film, no filter is necessary.
Divide your snow scenes into three classes.
Snow-covered landscape: practically all the scene is snow.
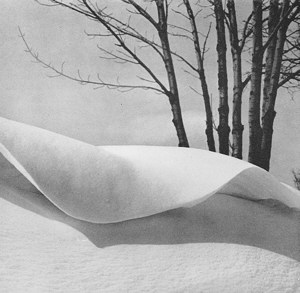
Class these scenes as light subjects. Use side or back lighting. Both show land contours and snow texture well. Exposure for snowscapes is simple. Because snow reflects light equally in all directions, front, side, and back lighting take the same exposure settings.
Snow scene: people, trees, etc., taking up 1/4 to 1/2 the picture.
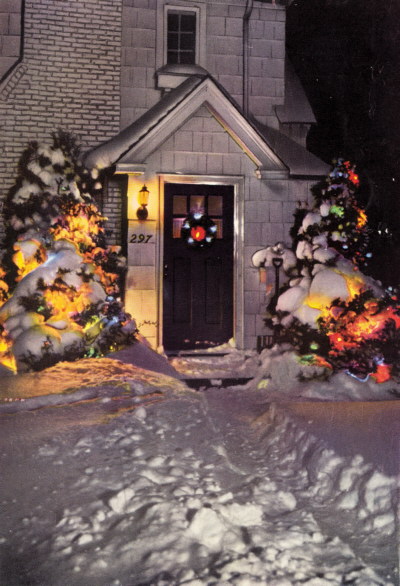
If you are most interested in the scene, class it as a light subject, thus favoring the snow. If you are most interested in people or other objects, class the scene as average, favoring the subject. In either case, side or hack lighting can both give good results. The cover illustration is a back-lighted scene of this type.
Close-ups of people, animals, trees, etc.: little snow is visible.
In general class these as average subjects. Subjects darker than average in color, class as dark. Only very light-colored subjects should be classed as light. Front lighting works well. Side lighting, and more especially back lighting, can give beautiful results. Excellent informal portraits can be made this way. Side- and back-lighted close-ups take more exposure than front-lighted.
ABOVE ZERO WEATHER
Taking Snapshots Just Outside the House
The chances are that some of the cold-weather pictures you take will he snapshots made right outside the house. For these cold snaps, the technique you should use is simple.
Load your camera with film before you go out. If possible, you should also decide in advance what your lens and shutter settings are going to he and make these settings before stepping outdoors. Once outside, take pictures as usual, but protect your camera from snow. Just before taking a picture, make sure that no snow crystals have fallen on the lens and melted. Wipe the lens dry if this happens, and shield it at least till the picture is taken.
If you have had your camera outdoors long enough for it to get chilled, moisture will condense on it when you bring it back indoors. If this moisture is on the lens, you can't take sharp pictures, so don't try to use your camera right away. Instead, give it a few minutes to warm up. As it warms, the moisture will evaporate.
Winter Sports, Field Trips, and Excursions
Winter hikes. trips, skiing and skating parties, etc., will he times when you'll want to take a lot of pictures outside. Any time you plan to be outdoors taking pictures for more than half an hour, and the temperature is not below zero, here's what to do.
Before You Go
Load your camera with film before you leave, and if you expect to use up more than one roll or pack, carry your spares in an inside coat pocket where they will keep warm.
Your Camera
The chances are you won't need to keep your camera warm. In other words, you can carry it in a field case or an outer pocket. If, however, you find that the controls, particularly the shutter or focusing adjustment, are difficult to work, then the camera is too cold. In this case, put the camera inside your outer clothing and keep it there between pictures. When you first put it there, moisture may condense on the lens. If this happens, don't try to take pictures right away, but wait for the camera to warm up and the moisture to evaporate. If the moisture is heavy, wiping the lens may hurry the drying. As long as the camera does not become too cold again, you should have no further trouble operating it.
Although you may not need to keep your camera warm, there are a number of other ways in which you should protect it. When you are taking the picture, keep the exposed parts of the mechanism covered as much as possible, so that snow crystals are not deposited on the lens, nor whipped by the wind into the openings around the shutter release and adjusting levers.
Reasons for Using a Filter
A good idea any time you are taking snow pictures, whether in black-and-white or in color, is to cap the lens of your camera with a filter - a Kodachrome Haze Filter for color pictures or a Kodak Wratten K2 Filter for black-and-white. Besides correcting excess bluishness in Kodachrome pictures, a filter will do another important job it will keep snow off the lens. Of course snow will get on the filter, but a filter is easier to clean than a lens, and easier to dry.
The Film
Besides taking these precautions, you should also handle your film with greater care. When a loaded camera is kept in a heated house, the film tends to dry out and becomes somewhat brittle. Film which is dry, and cold too, may be brittle and liable to snap, and the colder the film gets, the more brittle it will be. So, when you turn the film ahead in your camera, turn it slowly, avoiding sudden jerks. Pull the tabs on film packs carefully for the same reason, and if you have to load a movie camera, form the film loops smoothly without making such sharp bends that you snap the film.
Going Indoors
If You take your cold camera into a warm skiing or skating shelter, or house, moisture may condense on it. You should not take pictures until the camera is warm enough for this moisture to evaporate. Be sure the lens is dry before you go out in the cold again. If there should be moisture on the lens surface, it will freeze when you get outside, and you will be unable to take sharp pictures.
The outside covering of your camera may be made of imitation leather or some similar material, glued on. If moisture should condense on it when you get indoors, wipe it off frequently so that the covering does not wet through.
BELOW ZERO WEATHER
When the temperature sinks below zero, perhaps your enthusiasm sinks with it, but the chances are that you will want to take pictures just the same. Picture taking in below zero weather is no different from picture taking in somewhat warmer weather if you just want to take a few pictures outside the house. But if you intend to be outdoors for longer periods, you will have to chart a different course.
For an occasional snapshot near the house outdoors, even in extremely cold weather, you can use the same technique as for taking snapshots just outside the house in moderate cold. If your camera gets chilled, be sure to wipe the lens and outer covering dry should any moisture form on them when you get back indoors.
Winter Sports, Field Trips, and Excursions
If You intend to be outdoors for long periods, or to be taking pictures outdoors on a number of days in a row, you had better plan to take greater precautions.
Tests and Preparations-You
Give yourself, as the photographer, first consideration. Plan to dress warmly because picture taking frequently calls for a lot of standing still as well as fast thinking and quick movements to capture bits of action. If you are cold, your reactions may be slower, and your snapshot may be that vital fraction of a second too late. This means that your hands should be especially well protected.
A must, if you are taking pictures in extreme cold (25 degrees below or lower), is a pair of silk or thin cotton gloves which you should wear under your mittens. These are important. You have to take your mittens off to operate the camera and if you touch the metal parts with your hare fingers, you may get severe frost "burns," and your fingers may stick to the parts.
Your Camera
Extreme cold causes some camera parts to contract and bind, and oils and greases to harden. When this happens, camera parts either work slowly or not at all. Some helical focusing threads have oil or grease on them which sets so that changing focus at low temperatures is almost impossible. Shutters may work too slowly at extreme temperatures and may even stick fast. The parts of an old camera which has been used considerably may be loose enough to work fairly well in the cold; on the other hand, if dust and dirt have got into them, they may stop working altogether.
All things considered, both still and movie cameras work best when kept warm. You should plan to do this by making the tests and preparations described below.
Still Cameras.
It is a rather simple matter to protect your still camera if it is small, because you can just keep it under your coat, but in the case of larger cameras, especially the press-type, this is not practical. For these, it's a good idea to find out how much protection the camera actually needs. To do this, test it in a frozen-food locker as described below for movie cameras. If the camera does not work well in this test you should plan to keep it warm with chemical heating pads in the same way suggested for movie cameras. Focal-plane shutters having cloth, plastic or rubberized curtains should not be used unless you plan to keep the camera warm.
Movie Cameras.
In extreme cold the average spring-driven movie camera either runs too slowly or does not run at all. You can find out about how well yours will work when cold by testing it in a frozen-food locker. To make this test, load your camera with film, and put it in a frozen-food locker which is set for about ten below zero. Leave the camera there for half an hour or more.
Keeping the camera in the locker, try focusing it and changing the lens opening. Next, push the exposure release button and try changing the speed setting. If it runs faster at the 32-frame setting than it does at the 16, it will be safe to use at 16 with the usual exposure recommendations. If it runs faster at 64 than it does at 32, it will be safe to use at 32. If, however, the camera does not change speed when you change the speed control, then the lubricant is probably stiff and holding the speed down. You can't be sure how fast the camera is running if this is so.
If your camera does not have more than one speed setting, you can tell if it is running about right by the sound. It should sound the same as it does when you run it at normal temperatures.
If your camera (and all its adjustments) seems to work properly in the frozen-food locker test, then you can skip the next few paragraphs; if it doesn't, you should plan ways to keep it warm when you are out picture taking. Here are some ways: You can keep a small camera in either an outside pocket or an inside one, depending on how warm you think it has to be. If this is not practical, or the camera is large, you can keep it warm with a couple of the pocket-size chemical heating pads sold in most drugstores. These pads are not expensive and heat up when you put water or snow in them. They stay warm about three hours on two teaspoons of water, and can be recharged with water six or seven times before they no longer give heat.
There are a number of ways you can use these heating pads to keep your camera warm. You can make a carrying case or bag which has room for one pad on each side of the camera. An even simpler way is to strap or tie them around the camera, but if you do this, arrange them so that you can get at the exposure button and so that one pad can be removed easily when you need to rewind. If you use rubber bands to fasten the pads around the camera, make sure that they are new and flexible because old rubber sometimes gets brittle and snaps when it's cold. In an emergency, you can even hold the two pads in place with your hands. This, incidentally, has the advantage of keeping your hands warm besides being expedient.
Winterizing for Continuous Cold-Weather Use.
If you are going to be taking pictures at sub-zero temperatures for a number of months and know that you will not be using your camera indoors during this period you should consider having your camera winterized. When you winterize your car, you remove the summer oils and greases and put in some which will flow readily at low temperatures. In winterizing your camera, about the same is done except that, for very low temperatures, no lubricant is put in at all. Winterizing a camera requires complete dismantling and overhauling and is, therefore, a rather expensive service. However, some camera manufacturers will do this job for you if you find it is really necessary. You should bear in mind, however, that you cannot take pictures indoors or in warm weather with a winterized camera without damaging it and that you must, therefore, have the camera overhauled again and de-winterized before you use it to take pictures at normal temperatures.
Don't Oil. Do not, under any circumstances, try to oil your camera if it sticks in cold weather. Even one drop of oil or solvent working its way through the mechanism of your camera may cause the camera to stop operating altogether.
The Film
Cold film is brittle if dried out, and may snap in use. While most films are now packaged to resist changes in their moisture content, some do tend to dry out if kept for even a few days in a heated house where the relative humidity is low. If you plan to use your film in a cold camera, it is better to store it in an entranceway or any other part of the house which stays cold.
Batteries
Your camera is not the only piece of equipment which you should protect against extreme cold. If you intend to take flash pictures., you must make special arrangements to keep the batteries of your flash unit warm. Once they get thoroughly cold, these batteries will fail to deliver enough current to flash a lamp (they revive when warm again), and this may be true no matter how many batteries you use. The easiest way to solve this problem is to carry your batteries in an inside pocket and put them in the flash unit when you are ready to take the picture. If you plan to take a lot of flash pictures, carry an extra set of batteries in case the set you are using gets too cold. The next most practical solution is to carry the batteries in your pocket but run wires to the flash unit. If you can't do any of these things, use chemical heating pads to keep the flash unit warm.
Straps and Cases
Shoulder straps and carrying cases may need a little special attention, too, if you expect them to stay pliant at sub-zero temperatures. Rubbing them thoroughly with a good wax leather-dressing will protect them and help insure pliancy.
A wise precaution is an extra shoulder strap. Straps of all kinds may break without warning when very cold. Don't just carry this strap as an extra. It will be no comfort to know you have it when the snapping of your regular strap drops your camera deep in a drift. Run the extra strap around your waist and fasten it to the carrying case. This way it will both serve as a spare and keep the camera from swinging about and interfering with your movements.
Getting Ready to Go
Load your camera with film, check your flash-battery protection, and put your spare supply of film in an inside pocket where it will keep warm. If you are taking a large quantity of film with you, carry one reload in your pocket. Carry your still camera in its case inside your jacket, strapped so that it won't swing about. A movie camera or a still camera without a case should be carried in an inside coat pocket and kept there between scenes so that it will keep warm. If you use heating pads to keep your camera warm, and if you are going outdoors with a warm camera don't charge the heating pads with water and put them around the camera until just before you go out. If, however, you have already had your camera outdoors and it has become quite cold, you should charge the pads, fasten them around the camera, and then wait about 15 minutes before taking pictures. It takes about this long for the pads to warm up, for the heat to thoroughly warm the camera mechanism, and for the condensed moisture to evaporate.
Out in the Cold
Taking the picture.
Regardless of how you are keeping your camera warm, the same technique is followed when you take a picture. just take the camera out, set it, shoot the picture, and put it back again. If you have the camera out very long, so that it becomes chilled, it is likely to become steamed up when you put it back under your coat. The only consequence is that you cannot use it again immediately. You must allow time for it to warm tip and for the dew to evaporate. Fortunately, most winter pictures on a given occasion seem to take about the same camera settings for focus, aperture, and shutter time. This simplifies the whole operation and permits you to cut the time that the camera itself is out in the cold to a bare minimum.
Use a filter over your camera lens. It keeps the snow off, and is easier to clean. Use the Kodachrome Haze Filter when taking color pictures. It reduces the bluish effect.
Remember that cold film may be very brittle so when you turn it ahead, do it slowly. Pull film-pack tabs slowly too. Film in a very cold camera tends to lose speed, but the shutter slows down too so no exposure compensation is usually needed.
Night Flash pictures.
When the flash unit is attached to the camera, it illuminates the foreground brilliantly. This brilliant light is reflected by the snow into the upper inside surface of the bellows and from there to the film where it causes an over-all veil. The best way to avoid this is to use an extension flash unit considerably to one side and higher than the camera. If you don't have an extension flash unit, it may be possible to use the flash unit separately from the camera, making the picture by the open-flash technique. When you can't do either of these things, try tilting the flash unit upward a little or arranging some object so that it will cast a shadow in the immediate foreground area.
Shooting from a car.
If you take pictures from a car, either roll down the window before you shoot the picture, or clean the glass carefully. Don't take color pictures through glass unless you are sure it's colorless.
Reloading.
The reloading of any camera with film should be done where it is warm if possible. Reloading the threading type of movie cameras out in the cold calls for a word of caution. In forming the loops, be sure that you make the bends as large as possible to avoid snapping the film. Wear your silk or thin cotton gloves. The corners and edges of movie film, when cold, are very sharp and they will gash your fingers if you are careless. The gloves are good insurance against cuts.
After reloading your camera with the film which you have kept warm in an inside pocket, take another one from the spare supply and put that in the pocket to warm up for the next reloading.
If the Camera Gets Cold.
If your camera should get cold, and because of its size or some other reason it is impractical to warm it under your Jacket or with heating pads, the shutter action may be affected. If you can take the camera into a warm place to get the shutter working again, so much the better. If you do this, however, you must allow time for the moisture which will condense on it to evaporate again. Be sure not to go out again with dew still on the lens. Even a thin film of moisture will freeze and affect definition. If it is not practical to take the camera to a warm place, you may be able to get satisfactory action from the shutter by snapping it a number of times with the lens covered, before taking each picture.
Going Back Indoors
Going back indoors isn't quite as simple as walking in the door, because what you do then depends on whether you are planning to take your next pictures outdoors or in.
If You Plan Going Out Again
If you plan to take your equipment out into the cold again without using it indoors first, store your camera, film, and all equipment except the batteries for flash units or camera motors in a cool entranceway. Even if your camera is quite cold, moisture will probably not condense on it, if the place where you keep it is cool. Your batteries, however, should be taken indoors and allowed to warm up thoroughly. If any of your equipment failed to work well outside, try it before you go out again. If it is necessary to bring a cold camera indoors, allow it to warm up thoroughly and dry before taking it out.
If You Plan to Take Pictures Indoors
If You are coming indoors from a picture-taking expedition which has kept you out in sub-zero weather till your equipment has been chilled, and you intend to use the equipment for indoor picture taking when you use it next, open the equipment up so that you can be absolutely certain that any moisture which condenses on it will be completely eliminated in the warming and drying process. If you do not intend using the equipment for cold-weather picture taking again, and your camera has been winterized, send it back to the manufacturer to be put in shape for operation under normal conditions.
SPECIAL INFORMATION
For the photographer who finds it necessary to carry on photographic work, including processing, under the extremes of arctic climates, special information on specific questions is available on request from the Sales Service Division, Eastman Kodak Company, Rochester 4, New York.
SELECTED REFERENCES
Picture Taking
MOUNTAIN PHOTOGRAPHY
Ansel Adams. Complete Photog., 7: 2625-41, Issue 41, (1942)
Of general interest. Deals mainly with black-and-white photography but also discusses esthetics, filters, exposure and photography in color.
COLD WEATHER MOVIES.
D. Hamm. U.S. Camera, 10: 71-72, Mar. (1947)
For the amateur Gives tips on the making of skiing and tobogganing movies and advice on clothing, exposures, filters, and equipment.
SNOW THE TRANSFORMER.
William S. Davis, Amer. Phot., 38: 36-37, Jan. (1944)
For the pictorialist. Covers the esthetics of snow photography, composition, grouping Of masses, tonal balance, effective printing, mood, etc.
ARCTIC AND HIGH MOUNTAIN PHOTOGRAPHY.
B. Washburn. Complete Photog., 1: 274-80, 281-89, No. 5, (1941)
Must reading for the expeditionary photographer. Treats the personal and equipment problems which arise in extreme cold and high altitude.
Equipment
CAMERAS AND CLIMATES.
Walter Clark. Pop. Phot., 18: 56-57, 170, 172-80, No. 6, June (1946)
Discusses the mechanical, chemical and biological effects of climate, both arctic and tropic, on photographic equipment and sensitized materials. Methods for prevention of undesirable effects of the climate.
Processing
PHOTOGRAPHIC PROCESSING AT LOW AND SUB-ZERO TEMPERATURES.
R. W. Henn and J. 1. Crabtree. J. Phot. Soc. Amer., 12: 445-51, Oct. (19461)
Provides the formulas for special developers, the time-temperature curves for developing and fixing, and other information needed by anyone processing photographic materials at temperatures much below 68°F.
KODAK SKYLIGHT FILTER
The Kodak Skylight Filter will reduce the excessive blueness, of distant scenes, of snow shadows under a blue sky, and of scenes photographed in open shade or on cloudy days. Remember that some blueness is natural to these subjects. Do not change the exposure when you use this filter.
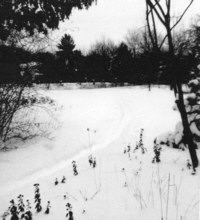
Above, a scene photographed an a dull day has gray, lifeless snow.

Above, the same scene in sunlight sparkles with interest, and snow texture is revealed.
KODAK FILTERS FOR BLACK-AND-WHITE SNOW PICTURES
Many snow scenes taken on black-and-white film photograph better if filters are used. On panchromatic film, a pure blue sky ussally photographs in a medium or dark shade compared to snow. If you need to darken the sky further, yellow, light green, or red filters will do it, and because shadows are lighted principally by the blue sky, shadovs will be darkened too. This means that snow texture will be emphasized because the small cast shadows that reveal texture will be darker.
Kodak Wratten K2 and Cine-Kodak CK3 Filters. If you want a single all-purpose filter, use one of these pale yellow ones, the K2 for stills, or the CK3 for movies, and set the lens one opening wider.
Kodak Wratten X1 Filter is a pale green filter for still or movie cameras. It gives a pleasing rendering in close-ups of faces, with moderate sky darkening. Some photographers prefer the snow rendering with this filter. Set the lens 1 1/2 openings wider if you use it.
The Kodak Wratten A Filter is red. It cuts out much more blue light than the CK3 and gives more extreme effects. Clouds stand out sharply against a black sky, and snow shadows are dark and clearly defined. With this filter, set the lens three stops wider.
SELECTED KODAK PUBLICATIONS
On Sale at Kodak Dealers
Kodak Reference Handbook.
A convenient binder containing separators and seven Kodak Data Book sections (Data Books without covers). It can be kept up to date by replacing out-dated sections with new editions of the following seven Data Books:
Kodak Lenses, Shutters, and Portra Lenses.
A Data Book to read for better understanding of lenses and shutters. Optical formulas, graphs, and Data Sheets make it a valuable reference book.
Kodak Films.
A Data Book treating the physical and photographic properties of black-and-white films, and including Data Sheets for Kodak roll films, film packs, and sheet films.
Filters and Pola-Screens.
A Data Book which discusses the theory and use of filters and Kodak Pola-Screens. Includes Data Sheets for the more popular Kodak Wratten Filters. Illustrated in color.
Kodachrome and Kodacolor Films.
A Data Book on still photography and home movies in color. Discusses lighting, exposure, and many special subjects. Illustrated in color. Includes Data Sheets.
Kodak Papers.
A Data Book on the characteristics of contact and enlarging papers, and methods of selection and use of papers for prints of high quality. Includes Data Sheets.
Processing and Formulas.
A Data Book presenting a comprehensive group of Kodak formulas. It discusses principles and procedures for processing films, plates, and papers.
Copying.
A Data Book dealing with the copying of all types of originals. Includes Data Sheets for the most suitable Kodak films.
Kodak Photographic Notebook.
A loose-leaf, metal-ring binder containing five separators, a quantity of notebook paper, and an introduction with suggestions on how to make the notebook into a valuable supplement to the Kodak Reference Handbook.
Kodak Data Books not included in the Kodak Reference Handbook but punched for insertion in the Kodak Photographic Notebook are:
Ektachrome and Kodachrome Professional Films.
A Data Book on the Kodak sheet films for color photography, including extensive information on their use. Illustrated in color.
Slides.
A Data Book on the making and showing of slides and transparencies in black-and-white and in color.
Infrared and Ultraviolet Photography.
A Data Book describing both the principles and practice in these two specialized fields.
SALES SERVICE DIVISION
EASTMAN KODAK COMPANY - ROCHESTER 4, N.Y.
11-49E-CH C4 PRINTED IN THE UNITED STATES OF AMERICA
|
You may copy and print this document or parts of this document for your own personal use. You may not, however, reprint or republish this work, in whole or in part, without prior permission from me, Mischa Koning. Such republication includes inclusion of this work in other Web sites, Web pages, FTP archives, books, magazines or other periodicals, CD-ROM and DVD-ROM compilations or any other form of publication or distribution.
|
|