|
|
 |
|
T h e R e t i n e t t e G u i d e
|
 These web-pages have been scanned and converted from a photocopy of the "Focal Press" publication "Retinette Guide", 1965 edition. There may be reference to "current" and "discontinued" models. Obviously all Retinette cameras are now long discontinued, but For ease of editing if nothing else, all the original text has been retained.
The original book was divided into two sections, effectively an overview and a "green pages" section covering specific models in more detail. I've not bothered with a green background to these pages, but hopefully I will have included links where appropriate to the relevant text.
Table of Contents
- The Retinettes
- Handling the Retinettes
- Retinette Films
- The Technique of Focus
- Close-Up Work with the Retinette
- The Technique of Exposure
- Flash with the Retinettes
|
The Retinettes
The Retinettes are miniature cameras producing a negative 1 in. x 1½ in. (24 x 36 mm.) on 35 mm. film. A single load of film in a standard cassette will take up to 36 exposures. The film can be loaded and unloaded in daylight. The Retinettes are snapshot cameras for all general photography, especially candid action and other life subjects.
The Retinettes owe their mechanical qualities to the fact that they use the same die-cast body unit and transport mechanism as their more expensive sister, the Retina series of cameras. The body has a hinged-on back, the lock of which is covered by a protecting safety latch to prevent accidental opening of the camera. The body itself is rigid (bellowless), the lens and shutter unit being mounted on the front panel.
The Retinette film track is specially designed to keep the film really flat without risk of scratching the emulsion. The film is wound on by a transport lever, which with one full swing advances the film to the next frame, and also moves the film counter and re-tensions the shutter. That system provides an efficient double exposure lock, which can, however, be circumvented by special deliberate procedures. The film lock, which arrests the film after each frame, can also be released for advancing the film without exposing it (e.g., when reloading a partly-used film).
The viewfinder in the latest models of all Retinettes is a large bright line-frame reflecting eye-level finder, showing the image almost in natural size. Previous models of the Retinettes have an optical direct vision finder, showing the image about three-quarters natural size. The finder is placed centrally above the lens, thus avoiding lateral parallax errors.
The Reomar f2.8 lens (made by Schneider and by Rodenstock) is fitted on the latest Retinette IA, IB, II, IIA and IIB cameras, while the Retinette I and earlier IA have an f3.5 Reomar. It is a 3-element triplet with a focal length of 1¾ in. (45 mm.), covering an angle of 51°. It has a front cell focusing mount which can be focused down to 3½ ft. Definition and colour correction are very good. The optimum performance is reached at f6.3. A depth of field indicator is fitted.

EARLY RETINETTE CONTROLS
Lens: L1, lens; L4, aperture speed index. Focusing: F1, focusing mount; F2, distance scale. Shutter: S2, shutter release; S4, shutter speed scale; S6, light value control; S8, shutter speed ring; S9, flash socket; S10, cable release socket (in release button); S13, self-timer lever. Viewfinder: V1, viewfinder; V2, finder eyepiece. Film and transport: T1, rapid winding lever; T4, film counter; T5, film counter setting wheel; T6, film indicator (in rewind knob); T7, rewind knob; T8, reversing button; T9, film release. Body: B3, back lock; B7, tripod bush; B8, accessory shoe.
Top: Top view. Upper centre: Front view. Lower centre: Bottom view. Bottom: Rear view of upper part of camera.
|
RETINETTE IA AND IB CONTROLS
Lens: L3, aperture lever; L4, aperture scale. Focusing: F1, focusing mount; F2, distance scale; F3, depth of field scale. Shutter: S2, release button; S4, shutter speed scale; S8, shutter speed setting ring; S9, flash socket; S10, cable socket in release button; S13, self-timer lever. Exposure meter (on model IB); E2, meter cell; E4, exposure setting ring coupled with exposure meter needle; E6, film speed adjustment. Viewfinder: V1, finder window (shows exposure meter needle on IB); V2, eyepiece. Film and transport: T1, rapid winding lever; T4, film counter; T6, film indicator in rewind knob; T7, rewind knob; T8, reversing button. Body: B3, back lock; B7, tripod bush; B8, accessory shoe with second flash socket.
Top: Top view of the Retinette IB, Upper centre: Front view of the Retinette IB, Lower Centre: Rear view of upper part of the Retinette models. Bottom:Front view of top section of the Retinette IA.
|
RETINETTE I, II AND IIB CONTROLS
Focusing: F1, front cell focusing mount (l) or focusing knob (connected to front lens mount on models II, IB); F2, distance scale; F3, depth of field scale or automatic depth of field indicator. Shutter: S2, release button; S5, light value scale: S6, light value setting lever; S8 shutter speed setting ring: S9, flash socket; S10, cable release socket (in release button); S13, self-timer lever. Exposure meter (IIB only; E2, meter cell; E5, light value scale on meter setting ring; E6, film speed setting; E7, meter needle: E8, setting pointer. Viewfinder: V1, finder window; V2, eyepiece. Film and transport:TI, rapid winding lever; T4. film counter; T5, film counter setting button; T6, film Indicator; T7, rewind knob: T8, reversing button; T9, film release button. Body: B3, back lock; B7, tripod bush; B8, accessory shoe; B11, eyelets for carrying strap. Special features: Z1, illuminating window for finder frame.
Top:General view of the Retinette IB against a 1 in. scale grid. Upper centre: Top view of Retinette IIB. Lower centre: Front view of Retinette IIB. The Retinette II is identical, but without the exposure meter and meter controls. Bottom:Front view of the Retinette I.
|
The Retinette Models
*RETINETTE I (1958) follows the general description on page 4, being fitted with a 1¾ in. (45 mm.) Reomar f3.5 lens, Compur-Rapid shutter with light values, and line-frame finder.
RETINETTE IA (1959) is similar to the Retinette I but with 4-speed Vero shutter, 1/30-1/250 sec. and B. Since 1961 it has been fitted with the f2.8 Reomar.
*RETINETTE II(1958) is similar to the model I, but has a 1¾ in. (45 mm.) Reomar f2.8 lens, automatic depth of field indicator and a film counter built into the body itself (instead of being mounted on top).
*RETINETTE IIB (1958) has the same features as the Retinette II, but in addition is fitted with a built-in photo-electric exposure meter.
*RETINETTE IIA (1959) is similar to the model IIB but with Prontomat shutter giving fully automatic exposure setting. Handling is the same as for the IIB, except for shutter speed and aperture where special instructions apply. See Prontomat p.12 and Retinette IIA Exposure Meter, p.51.
RETINETTE IB (1959) follows the general description of the Retinette on p.4. It has a built-in photo-electric exposure meter which is coupled to the aperture setting. The shutter is the Pronto LK speeded from 1/15 to 1/500 sec., B, line frame finder and f2.8 Reomar lens.
*Retinette (1954) Is similar, but fitted with a simple eye-level optical finder. The earliest models of 1954 did not incorporate a light-value scale on the shutter.
*PRE-1954 MODELS. Between 1942 and 1952 some cameras of the Retinette family were made with bellows, pressed-metal (instead of die-cast) body, slow lenses of f4.5 or f6.3, and three to eight-speed shutters. These were also called Retinette.
Models marked * are no longer in production but may still be available in some countries.
Coated Lenses
The Reomar lenses of the Retinette cameras are coated. Coating, or, as it is sometimes called, blooming, consists of the application of a microscopically fine film of magnesium fluoride on the lens surfaces which considerably reduces the light reflection at glass and air surfaces in the lens. This results in a more brilliant negative, especially in the shadow regions where the tones are most subdued and so brilliance and contrast are most needed. The fact that a lens has been coated can be recognised by observing in the lens reflections of, let us say, a lamp, which appear distinctly coloured, as a rule rather deep blue with a tinge of red.
The Care of Lenses
The treatment and care of lenses is important. On account of its chemical composition, high quality optical glass is susceptible to the influence of moisture, and for this reason never touch the glass with the fingers. Since complete protection is impossible, clean the lens surface occasionally with a clean, soft chamois leather. Grease, rain spots, etc., may be removed with a pad of cotton-wool moistened in ether. Neither glass nor the coating film will be affected by this treatment.
Lens Hood
The lens hood is a tube, as a rule made from metal, placed over the front of the lens to protect it from light coming from outside the actual picture area. There is no picture which could not be improved in clarity and brilliancy by the use of a lens hood. The wider the aperture of the lens the more important is the use of the lens hood. When strong light coming from objects outside the actual picture area strikes the lens, it considerably reduces the brilliance of the picture. This applies not only to photographs taken against the light -- when the lens hood becomes indispensable -- but also to sunshine in general.
The Retinette models use a clip-on lens hood which grips the lens mount by means of spring cheeks.
The Shutter
THE COMPUR-RAPID shutters of the Retinettes carry speeds of 1, 1/2, 1/4, 1/8, 1/15, 1/30, 1/60, 1/125, 1/250 and 1/500 sec. and a B setting for time exposures. These speeds are marked as whole numbers thus 1/2 sec. is marked as 2, 1/125 sec. as 125, and so on.
To set the shutter speed, rotate the milled ring to bring the required speed opposite the index mark. The shutter speed scale rotates with the speed setting ring. For some of the speeds the light value setting may have to be re-adjusted (see page 10).
THE EARLIER COMPUR-RAPID shutter (without light values) is set by turning the milled ring so as to bring the red dot on it opposite the required speed. The speeds themselves are marked in the same way.
LIGHT VALUES. The shutter also carries a scale of numbers engraved in red on the same ring as the shutter speed scale and on models II and IIB on the same ring as the aperture scale. These numbers run from 2 to 18 and represent light values for correct exposure. Each light value represents a range of shutter speed-aperture combinations, but is covered by a single setting. The latest exposure meters are now also calibrated in light values; the reading can thus be transferred directly to the shutter.
To set the light value on the Retinette and Retinette I, push back the sickle-shaped lever behind the light value scale on the shutter rim and move it sideways to set the red dot to the required light value. Note, however, that only settings from 3½ to 18 are possible in spite of the fact that the scale shows figures down to 2. On the Retinette II and IIB the light values are engraved on the same ring which carries the lever and are set opposite a red arrow head on the shutter speed ring.
You can now choose any shutter speed or aperture without changing the exposure. If you alter the shutter speed, the aperture will automatically set itself to the correct value, or if you change the aperture, the shutter speed adjusts itself automatically to keep the effective exposure constant.
To change the shutter-aperture combination just move the speed setting ring until the index mark points to the required aperture or shutter speed respectively. Keep the aperture lever pressed against the speed setting ring to avoid changing the light value setting. Incidentally, intermediate light values can also be set, e.g., 5½, 6½. etc., for really accurate work.
The shutter may be used in the conventional way too; In this case the shutter speed has to be adjusted first and then the aperture.
FOR TIME EXPOSURES on either type of Compur-Rapid shutter set the index of the milled ring to B (brief time). On releasing, the shutter will remain open as long as the release button is pressed down and closes as soon as the pressure on the release is removed.
The green figures on the exposure scale are for calculating time exposures. With the shutter speed ring set to B, and the light value scale to one of the lower values up to 6, the green figures indicate the length in seconds of the exposure required and which stop to use. If, for example, the light value is set to 3 any of the following combinations may be used: 4sec. at f5.6; 8sec. at f8; 15 sec. at f11; or 30 sec. at f16. In that case, re-set the aperture by means of the light value lever, and expose for the required number of seconds.
For such time exposures the camera must be mounted on a firm support such as a tripod.
It is safest to release the shutter with the help of a cable release to avoid shaking the camera. This release screws into the bush in the centre of the body release of the camera.
For long time exposures -- where the shutter is to remain open for longer than you can conveniently keep the release depressed -- use a cable release with a lock. To make the exposure set the shutter to B, and press the cable release plunger with the locking plate lifted. The shutter will now remain open until the locking plate is depressed. On cable releases with locking screws, tighten the screw on pressing the plunger and undo the screw to close the shutter.
THE LIGHT VALUE SHUTTER
The Compur-Rapid shutter of the Retinettes has a light value scale and coupled aperture and speed settings. All the aperture-shutter speed combinations obtainable at a given light value setting correspond to the same exposure. On the Retinette II and IIB the light value scale is on the top of the shutter (left) together with the shutter speed settings. The aperture settings are underneath the shutter. On the Retinette and Retinette I the aperture-speed combinations are paired off opposite each other, and the light value scale is at the side of the shutter (right). To alter the shutter-aperture combination, move the milled shutter speed ring until the appropriate aperture and speed are opposite the index mark (on top and below the shutter on the Retinette II and IIB). See also page 10.
With a given light value (e.g. 11), setting a fast speed automatically opens the lens, while stopping down automatically sets a slow speed to keep the exposure constant (right). To alter the exposure for different light conditions, simply change the light value setting (left).
THE DELAYED ACTION RELEASE for self-portraits built into the Compur-Rapid (with or without light value scale) is brought into action by moving the lever on the left of the shutter to "V". On pressing the release button with the lever set to V the shutter goes off after a delay of approximately 12 sec., giving the operator time to take his place in the picture. It goes without saying that the camera must be mounted on a rigid support, preferably a tripod.
After having released the shutter in the delayed action setting, the lever automatically moves back into the standard position (X) to avoid the next exposure being inadvertently taken with the delay in action.
The shutter is flash-synchronized; for details, see page 59.
THE VERO SHUTTER of the Retinette IA has four speeds 1/30, 1/60, 1/125, 1/250 sec. and B, set by turning the outer milled shutter rim to the required speed. Time exposures are made as described for the Compur shutter. There is no delayed action.
THE PRONTO LK SHUTTER of the Retinette IB has 6 speeds 1/15, 1/30, 1/60, 1/125, 1/250, l/500 sec. and B, with built-in delayed action and flash contact. Speeds are set by the outer milled ring, time exposures as for Compur (page 9).
THE PRONTOMAT shutter of the Retinette IIA has no speed indication. In daylight set the sun symbol on the shutter ring to the black index mark and use the exposure meter as indicated on page 59. For flash pictures set the shutter to the flash-symbol (the shutter speed is 1/30 sec.) and proceed as for "X" flash synchronisation, page 67. For time exposures set "B" on the shutter ring opposite the black dot. The aperture is then always f22. Use the "22" on the right. The 22 on the left is for flash.
THE PRONTOR S or SV shutter of pre-1954 Retinette models has speeds from 1 to 1/300 sec. and is set by rotating the milled ring which carries the speeds to bring the required speed opposite the index mark on the front of the shutter.
This shutter (as well as the simpler ones fitted to some of these early models) requires tensioning separately before every exposure. For that purpose push the tensioning lever (just behind the shutter speed ring) anti-clockwise until it engages. The camera is then ready to shoot.
For time exposures proceed in the same way as with the Compur-Rapid shutter; again remember to tension the shutter. There is no green scale of figures. The cable release screws into the release button, or (on models before, 1951) into a socket next to the button.
To tension the self-timer, pull the lever with the red dot on the left of the shutter (seen from the front) clockwise as far as it will go. On some models this lever is also used for flash-synchronization (page 59).
|
Handling the Retinettes
Let us assume that we have a standard 35 mm. film cassette available for the Retinettes. Our first task is to load the camera with film. This should be done in subdued daylight.
LOADING
Top row: Open the camera back, pull up the rewind knob, insert the cassette in the film chamber. Second row: Push back the rewind knob, attach the film end to the take-up spool, close the camera back. Third row: Set the film counter to the diamond mark (Retinette I, IB, left; Retinette II and IIB, centre), press the film release and work the transport lever repeatedly. Bottom row: Carry on until the film counter indicates No.36; finally set the film indicator.
- Loading the Retinettes
- Open back.
- Pull out film rewind knob.
- Insert cassette with film in film chamber.
- Push back rewind knob.
- Thread film end into slit of take-up spool.
- Close camera back.
- Turn film counter to mark.
- Make blind exposures.
- Set film indicator.
- Turn the double lever surrounding the tripod bush in the direction of the arrow. Then press the little button underneath the lever, and the back will spring open.
- Pull out the milled knob above the empty film chamber.
- Insert the cassette so that the projecting spool peg lies in the recess in the bottom of the spool chamber.
- Pull out about 3½ in. of film from the cassette. Turn the built-in take-up spool so that the slot faces the camera back. Fix the film end In the slot. Make sure that the film lies flat in its grooves between the spools.
- The camera back is closed by pressing the back against the body until the catch engages.
- Turn the milled edge of the outer rim of the counter window while pressing (except on models I, IA) the film release button (on the rear of the top between finder and counter window) until the arrowhead points to the mark in the counter window. If a 20-exposure film is used, the diamond mark between the numbers 20 and 25 should be set to the arrow-head.
On the Retinette II and IIB push the film counter setting button at the right of the viewfinder in the direction of the engraved arrow while pressing the film release button behind the exposure counter window. Keep pushing the setting knob until the diamond mark beside the number 36 in the exposure counter is opposite the notch in the window. If a 20-exposure film is used the diamond mark between the numbers 20 and 25 should be set to the notch.
- Now pull out the rapid winding lever and let it fly back. Then press down the film release button. Repeat these two operations until the film counter indicates No. 36 or 20. The counter thus shows the number of the still-unexposed frames.
- Set the film indicator in the rewind knob by pressing the index finger against the serrated ring in the centre of the indicator and turning it until the index mark points to the type of film loaded into the camera.
|
PRE-1954 RETINETTE MODELS
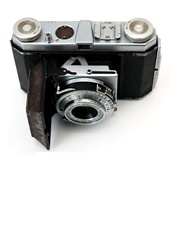
Right: The 1951 Retinette model was a folding camera with a somewhat different body layout. The lens was a 2 in. (50 mm.) Reomar f4.5 in a Prontor S shutter with speeds to 1/300 sec. The 1952 model had somewhat modified controls and an XM-synchronized shutter, but otherwise resembled the earlier model. In this later version the viewfinder housing extended right across the top of the camera.
|

Early Retinette features: Opening the camera back (left); the reversing lever at the back of the camera (centre left); opening the front (centre right); closing the front (press the two buttons at the side of the baseboard and push the front closed -- right).
Setting the shutter speed and tensioning the shutter (right); setting the aperture (far right). The shutter of these models had no light value scale.
|
Loading Pre-1952 Retinette Models
The general principles are similar, but certain details differ appreciably (see also page 8).
To open the camera back, lift up the latch at the side of the body and pull the back away. To close, press the back against the body and fold down the latch.
To make the blind exposures, first make sure the lever at the rear of the film winding knob is set to "A" (advance). Open the front of the camera by pressing the button in the bottom. Wind the knob until it locks, tension the shutter (page 9) and press the release button. Repeat this operation, and wind the film once more.
To set the film counter (after the blind exposures) turn the counter disc in the top of the body (by means of its two studs) to bring No. 1 opposite the arrowhead. The counter advances from 1 to 36. There is no film indicator.
Holding the Retinette
It is obvious that the camera should be held as steady as possible, as the slightest shake, even if not seen in the original negative, will become visible on enlargement.
A particularly steady hold of the camera is necessary when working with speeds below 1/60 sec.
Always stand with your legs apart.
For horizontal photographs: Rest camera horizontally against the nose while the eye looks through the finder. Keep both elbows close to the body, the right thumb being pressed against the camera back, right index finger stretching over the film counter to the body release while the right middle finger, bent downwards, presses on camera front. The left hand grasps the camera body on its left side. After every exposure move the right thumb to the bottom of the camera and pull out the rapid winder to advance the film.
For vertical photographs: Rest camera upright against forehead and nose, holding the top of the camera with the left hand. Keep the left thumb pressed against camera back. The right hand holds the camera from below, right thumb on the body release, the camera resting in the palm of the right hand. Work the rapid winder with the second or third finger of your right hand.
To release, use finger pressure only, keep the hand and its grip on the camera steady. The actual pressing down must be done slowly and smoothly.
For slow exposures in the hand rest the elbows or at least lean the body against some support in order to avoid shake. In this way 1/8 sec. and with a very steady hand 1/4 sec. can be exposed without noticeable camera shake.
Use of a tripod is necessary when taking time exposures and it is also recommended for speeds from 1/15 to 1 sec.A rigid tripod with ball-and-socket head should be employed to allow the changing from horizontal to vertical position. The tripod or ball-and-socket head top screw has to be screwed into the tripod bush in the bottom of the Retinettes.
HOLDING

Left: Holding the camera for horizontal shots.
Right: Holding the Retinette for vertical shots. See also page 18.
|
Left: To be ready for action all the time, carry the Retinette round the neck on a short strap, preferably in it's ever-ready case.
Below: Whenever possible, support your body against something solid, or prop your arms on a fence, railing, or even on your knees when sitting on the ground. This is specially important with slow snapshot exposures. Use a cable release for time exposures from a tripod.
|
Carrying the Retinettes
However elegant it may be to carry the Retinettes on a long strap hanging from the shoulder, this position is quite unsuitable for quick action. A better method is to carry the camera on a short strap round the neck, so that it lies on one's chest. Opening the case and lifting the camera up to the eye is then a matter of a split second.
The ever-ready case carries the camera ready for use; there is a camera holding screw which prevents the Retinettes from falling out of the opened case.
SHOOTING
Top row: Advance the film with the rapid winding lever (left); set the light value (Retinette and Retinette I, centre; Retinette II and IIB, right).
Second row: Select the aperture-speed combination (Retinette I, left; Retinette IB, II and IIB, centre and right).
Third row: Set the distance (Retinette and Retinette I, IB, left; Retinette II and IIB, centre), sight the subject in the finder (right).
Left: Release the shutter to take the picture.
|
Shooting with the Retinettes
The manipulations here described should be practised so that in time they will become practically automatic.
- Operate film transport lever.
- Set light value.
- Select aperture-speed combination.
- Set distance.
- Determine picture in viewfinder.
- Release.
- Swing the rapid winding lever through 180° to a definite stop. when it will automatically fly back into its original position. On old Retinette models turn the transport knob until it locks (see page 16).
- Determine the light value from an exposure meter (built-in on the Retinette IIB) or find it from an exposure table or calculator. Set this on the light value scale of the shutter (see page 10). On the Retinette IB and IIA use the meter as shown on page 51.
- Select the aperture-speed combination you want to use by turning the shutter speed ring to a fast speed (for action subjects) or to a small aperture (for greater depth of field). The aperture or speed respectively is automatically adjusted to give correct exposure corresponding to the light value set.
On the Retinette II and IIB the depth of field indicator (page 37) automatically shows the available depth of field as you move the speed ring; you don't have to worry about the aperture at all. The Retinette IB has a pair of engraved arrows on the shutter front to indicate the depth of field at f5.6.
On Retinette models without light value scale you have to set the shutter speed and aperture separately. For shutter speeds, see page 9. The aperture controls the effective opening of the lens. The smaller this opening (e.g., when the lens is "stopped down") the greater the depth of field. However, as less light can pass through the stopped down lens in a given time, the exposure must be longer.
To set the aperture move the aperture lever to the appropriate number. On models with light value scale, adjusting the light value also sets the aperture at the same time.
- Set the distance by turning the front of the lens mount until the distance figure engraved on the mount is opposite the black arrowhead on the front of the shutter. On the Retinette II and IIB move the focusing lever below the lens. The distance has to be estimated or can be measured with a separate rangefinder (see page 21) which may be attached to the camera accessory shoe. See also page 40.
- The optical finder with bright-line frame of the Retinette I, IB, II, IIB shows the subject area outlined by a brilliant frame reflected into the view. This automatically ensures that the eye sees the correct field at all times. Outside the frame the surroundings of the subject are also visible. When taking photographs nearer than 8 ft. the negative includes slightly less at the top of the horizontal picture. This reduction of the field is indicated by two short lines for 3½ ft. At distances above 3½ ft. the limit moves upwards to coincide with the bold top line at 8 ft. and over. The field lost on top is added on the bottom of the horizontal picture (see page 21).
The direct vision finder of the previous Retinette models should be held close to the eye. Do not attempt to turn the camera to the right or left, away from the eye, nor must the eye be moved from the centre of the eyepiece to find the limitation of the field of view. This "spying round the corner" is deceptive, as the film records only that section seen in the finder, when you hold the eye close to the centre of the eyepiece while looking straight ahead. The field of view given is exact for photographs taken at 9 to 12 ft. At infinity a trifle more appears on the negative than is seen through the finder, and at 3 to 6ft. a shade less.
- To release the shutter gently press the release lever. Speeds from 1/30 to 1500 sec. are instantaneous and can be taken from the hand. It is, however, advisable to use 1/30 as sparingly as possible from the hand, as there is some danger of jerking the camera, and even a slight jerk, six or eight times enlarged, results in unsatisfactory definition.
THE RETINETTE I, IA, IB, II, IIA AND IIB FINDER
Left: The Retinette I, IA, IB, II, IIA and IIB finder shows the subject in almost natural size, outline by a brilliant reflected line frame which appears suspended in space.
|

Left: The two marks below the top of the finder indicate the limit of the field at close distances owing to parallax. The full subject area covered at about 3 to 4ft. is shown here by the dotted lines. See also page 20.
|
A rangefinder may be fitted in the accessory shoe of the Retinettes. This has a fixed mirror and a movable one; a double image is seen in a bright central spot and these fuse together as control wheel is adjusted. The lens is then set to the distance indicated.
|

Unloading the Retinettes
After all exposures have been taken, i.e., when the film counter has reached No. l -- or No.36 on old models -- the film has to be wound into the cassette in order to remove it from the camera. Do this in subdued light.
- Depress reversing button.
- Rewind film.
- Open camera back.
- Pull out rewind knob.
- Remove cassette.
- Close camera back or insert new film.
- Depress the reversing button in the bottom of the camera. (On pre-1952 Retinette models move the reversing lever below the winding knob to "R".) Wind the rewind knob in the direction of the engraved arrow until all the film is wound back; this is done when the resistance of film rewinding ceases and the knob turns freely.
- Open the back as described on page 13 (No. 1).
UNLOADING
Top left: To rewind the film after exposure, depress the reversing button in the base of the camera. Top centre: Turn the rewind knob to rewind the film into its cassette. Top right: Open the camera back (see page 14).
Bottom left: Pull up the rewind knob. Bottom centre: Remove the cassette from the film chamber. Bottom right: Close the camera back again, or reload with a new film. See also page 22.
Cutting off Exposed Film Parts
If a film which is only partly exposed has to be processed, it can be cut off In the darkroom or in complete darkness. After the last exposure the film transport should be wound on once more (this in the dark), the camera back opened and the film cut about ½ in. away from the cassette. The exposed part on the take-up spool is removed by pressing the reversing button, winding the film from the take-up spool and wrapping it up in three layers of black opaque paper. The remaining film in the cassette can now be re-inserted on the take-up spool (the reversing button automatically jumps out on actuating the rapid winder), and the camera closed. If the re-inserting has been done in the darkroom no further blind exposure is necessary; if the film has been re-inserted in daylight, two blind exposures should be made. The exposure counter should be advanced by two to allow for the loss of film in cutting and re-inserting.
The process is virtually the same with pre-1952 Retinette models, except that the reversing lever (instead of the button) and the film transport knob (instead of the lever) are operated.
Changing Partly Exposed Films
To replace a partly exposed film by another one -- for instance, if you want to take a few colour photographs in between some black-and-white shots -- proceed as follows.
- Check number of unexposed frames shown on film counter.
- Rewind film.
- Unload.
- When reloading:
- Load film in camera.
- Close back.
- Set film counter to starting point.
- Depress film release while winding film on.
2. When rewinding the film be careful to wind only until you feel some resistance. In the ordinary way this resistance would have to be overcome in order to pull the film end from the take-up spool. If the film is to be reloaded again, you must not pull the whole film into the cassette, otherwise the film end will have to be extricated by opening the cassette in the darkroom for subsequent re-insertion into the camera.
3. Take the re-wound film out of the camera. For reference, note the number of exposures still left on the film and write this number on the label of the cassette. Then put it into a container or wrap it up. Now you can load the camera with any other type of film.
7. Do not press the shutter release button when you wind on (this would open the shutter and expose the already exposed frames). Press film release and wind the rapid wind lever until the required number (the next unexposed frame) appears in the film counter.
Early Retinette models and also the latest, have no film release, and you have to cover the lens while advancing the film, exposure by exposure, as you release the shutter each time.
The Film Release of the Retinettes
Apart from its application in changing partly exposed films (see above), the film release, where fitted, helps to free jamming which may lock the mechanism of the rapid winder. Simply depress this button to clear the winder, without losing a frame or risking a double exposure. If pressure on the film release does not release the winder, this automatically indicates that the end of the film has been reached.
Similarly, if you did not set the exposure counter when loading you may reach No. 1 on the exposure counter before the end of the film is reached. At No. 1 the rapid wind lever automatically locks. By pressing the film release lever you can re-set the exposure counter, which at the same time will free the winding lever. Should the winding lever stick in a between position, press the film release button on the base to make it spring back.
Double Exposures
The double-exposure lock of the Retinettes prevents accidental double exposures. To make a deliberate double exposure for special purposes, press the reversing button after the first exposure, and keep it depressed while tensioning the shutter with the rapid winding lever. The film then remains in position for a second exposure on the same frame. Note that operating the rapid winder after the second exposure also advances the film counter to indicate one frame more than the number exposed.
On pre-1952 Retinette models the double-exposure lock blocks the release button only. To make deliberate double exposures, re-tension the shutter by means of the tensioning lever, and release by pressing the release lever on the front of the shutter itself.
|
Retinette Films
The film for the Retinette cameras is the standard perforated cine film of 35 mm. width, as used in the majority of other 35 mm. cameras. It may be obtained as:
DAYLIGHT CASSETTES. These are the simplest form of Retinette film packings. The ready cut and trimmed films for 36 exposures are supplied in cassettes (also called "cartridges or patrones"), which can be loaded in daylight into the camera (see page 13). Colour films are generally supplied in 20 and 36 exposure lengths.
DARKROOM REFILLS. These are lengths cut and trimmed for 36 exposures and will have to be filled in the darkroom into a cassette (see page 28).
DAYLIGHT REFILLS. These are cut and trimmed for 36 exposures which are wound on to a centre spool (as used in the cassette) and covered with a black paper leader strip to allow the loading of a cassette in daylight (see page 30).
BULK FILM of 18 ft. to 200 ft. length. Here a suitable length has to be cut off to be loaded into a cassette in the dark room (see below).
Safelight
The loading of cassettes with darkroom refills or from bulk film has to be carried out in the darkroom.
In the case of panchromatic films (see page 31) only the dark green safelight may be used, but it is always safer to work in complete darkness. This is not difficult. It is, however, advisable to practise filling with a dummy film first in daylight before starting the darkroom work.
In the case of positive film (see page 31) amber light will do.
Handling, Winding and Trimming the Film
When handling the actual film, particular care must be taken not to touch its emulsion (matt) side. It should only be handled and wound on to the centre spool of the cartridge by holding the film by either side of its edge, preferably between thumb and index finger.
At the same time, it is of no less importance that the place in which the loading is done should be perfectly dry, clean and free from dust. Only a clean, spotless negative will produce flawless enlargements.
When using bulk film for loading cassettes, the edge of the work-bench can be marked with notches or drawing-pins to indicate various distances, let us say for 12, 24, 36 exposure of film. This considerably simplifies the measuring of film lengths in the darkroom.
The trimming of the film-ends is performed most simply with the aid of a 35 mm. film trimming template. At the beginning of the roll of film make the wedge-shaped cut for the centre spool and measure off the required length of film. At the end of this make the curved cut for the taking-up spool. The curved cut must not go through a perforation hole. When doing this job with the trimming template it leaves at the same time the correct cut for the take-up spool on the remaining film on the roll, so that about 4 in. of film are saved on every strip. When trimming film without a template it is sufficient to start the curved cut between the tenth and eleventh bottom hole from the end -- facing the emulsion side of the film -- as it is not essential to have the full standard cut when working with the Retinettes, a 2 in. (5 cm) cut will serve the same purpose quite well.
The ready-cut film is now wound on to the centre spool of the cassette, as described on page 30. While winding on, hold the film only by its edges.
This task can be simplified by the use of a special hand winder, a milled metal rod with a slit on one end to fit into the cross-pin fitting of the spool. A mechanical winder may be obtained to serve the same purpose. It can be attached to the edge of the work-bench.
When winding the film on and off, care must be taken that no great pressure is put on the film, and that the film-ends are not squeezed when drawing through the hand. Failure to take the first precaution may result in fogging, while neglect of the latter precaution may give rise to peculiar kinds of exposure effects known as "lightning flashes". These are due to static electrical discharges, and appear as dark, zigzag lines running from the edge of the film towards the centre of the picture.
LENGTH OF FILM REQUIRED FOR ANY NUMBER OF EXPOSURES
| Number of Exposures
| Length of Film Required
| Number of Exposures
| Length of Film Required
| Number of Exposures
| Length of Film Required
|
| in. --- cm. |
| in. --- cm. |
| in. --- cm.
|
| 1 | 11¾ | 30 | 14 | 31¾ | 80 | 27 | 51 | 130
|
| 2 | 13¼ | 34 | 15 | 33 | 84 | 28 | 52½ | 133
|
| 3 | 15 | 38 | 16 | 34½ | 88 | 29 | 54 | 137
|
| 4 | 16¼ | 41 | 17 | 36¼ | 92 | 30 | 55½ | 141
|
| 5 | 17¾ | 45 | 18 | 37¾ | 96 | 31 | 57 | 145
|
| 6 | 19¼ | 49 | 19 | 39¼ | 100 | 32 | 58½ | 148
|
| 7 | 20¾ | 53 | 20 | 40½ | 103 | 33 | 60 | 152
|
| 8 | 22 | 56 | 21 | 42 | 107 | 34 | 61½ | 156
|
| 9 | 23¾ | 60 | 22 | 43¾ | 111 | 35 | 63 | 160
|
| 10 | 25¼ | 64 | 23 | 45 | 114 | 36 | 64½ | 164
|
| 11 | 26¾ | 68 | 24 | 46½ | 118 | 37 | 66 | 167
|
| 12 | 28½ | 72 | 25 | 48 | 122 | 38 | 67½ | 171
|
| 13 | 30 | 76 | 26 | 49½ | 126 | Including trimming
|
Loading Retinette Cassettes
The Retinette cassette consists of a flanged centre spool which is in a one-piece shell; the film leaves the shell by a light-trapped slot. The centre spool can be removed from the shell by lifting either top or bottom of the cassette according to the construction of the particular make of cassette. Most of the cassettes of the daylight loading films are intended by their makers to be used once only. However, they can be re-loaded quite a few times -- if handled carefully.
WINDING AND TRIMMING FILM
1: The correct trimming of the wedge-shaped end (which is fitted to the centre spool of the cassette) with a standard trimming template.
2: Trimming of the curved cut with a standard trimming template.
3: The appearance of the trimmed film: left, wedge; right, curved cut.
4: The film cassette, its outer shell, centre spool and separate top.
5: How to fix the film to the centre spool of the cassette with a piece of adhesive tape.
6: Winding the film with the mechanical film winder to the centre spool.
7. Assembling the cassette
8. Loading the film into the camera.
Loading Cassettes with Darkroom Film
- Work in the dark.
- Prepare film.
- Open cassette.
- Fix film on centre spool.
- Wind film on centre spool.
- Insert centre spool into shell; the first 2 in. of film must extend from the light trap.
- Close cassette.
2. In the case of bulk film prepare the length to be used as described on page 26. When using darkroom refill remove its wrappings. It is useful to fold the first ½ in. (1 cm.) of the beginning of the film slightly backwards. It prevents its slipping away.
4. If the centre spool is fitted with a film catch, thread the tapered end of the film into it. In cases where the centre spool is fitted with a spring, thread the end under it and fold it sharply back. If the centre spool is without any suitable fitting to hold the film, it has been proved best to wind a 1½ in. (4 cm.) piece of adhesive cellulose tape round the centre spool, so that on either side about ½ in. tape is used to secure the film (see page 29).
5. Wind film on centre spool moderately tightly. Care must be taken to see that the fingers do not come into contact with the emulsion only the back and sides of the film being touched.
7. When using some makes of cassettes, it is essential to fix the top or bottom cover to the shell, preferably with a length of adhesive cellulose tape.
Loading Cassettes with Daylight Refills
- No darkroom is necessary.
- Remove wrapping and label of refill.
- Open cassette.
- Introduce refill into shell of cassette; the first 2 in. of paper has to extend from light trap.
- Close cassette.
- Pull out paper-leader and 2 in. of film.
- Cut off paper-leader.
4. The original centre spool of the cassette is not needed and may be kept separately.
5. When using some makes of cassette, It is essential to fix the top or bottom cover to the shell, preferably with a length of adhesive cellulose tape.
The Choice of Material
There is no such thing as a "best" film for any or every kind of picture. Each type of film has certain characteristics.
COLOUR SENSITIVITY. Practically all 35 mm. films are sensitive to all colours. They are known as panchromatic. Some types, particularly those of high sensitivity, are especially sensitive to red. They are thus very suitable for use with artificial light which is richer in red than daylight.
INFRA-RED FILM. Infra-red film is a negative material which, unlike panchromatic films, is made sensitive to infra-red rays, which are not visible to the human eye. Special applications of this material: photography by "invisible" light, long-distance shots, fog or mist penetration, scientific copying and research work.
ORDINARY FILM. For copying black-and-white objects (books, ledgers, etc.) a positive film can be recommended. Besides its qualities of fine grain and high brilliancy, it possesses the further advantage that it can be handled in an amber darkroom light.
SPEED. The sensitivity of film materials to light in general is expressed by various scales, such as BS, ASA, DIN, and so on.
While a scientifically correct conversion of one speed rating system to another cannot be made owing to their different principles, the list on page 32 gives some guidance as to their practical relationship.
Each value represents twice as fast a film speed as the one above it. In some systems doubling film speed means increasing the speed number by 3 each time (BS Log., DIN), in others the speed itself is directly proportional to the speed number (BS Arith., ASA, Weston).
Slow films of less than about 40-80 ASA can be usefully employed for scientific photography, copying and architectural details. Their main advantage is in their extremely fine grain. making special development unnecessary. Their disadvantage is in their inability to cope with live subjects in other than exceptionally favourable lighting conditions.
Medium films of 80-160 ASA are the right material for the beginner, and can be well employed for any of the average subjects. Their advantages are: reasonably fine grain without the use of too complicated methods of development, correct tone rendering, good resolving power. Disadvantage: further loss of speed if fine grain development has to be employed for the sake of big enlargements.
Fast films of 200 ASA and over for high-speed sport shots, interiors, stage pictures and night photography. Advantages: increased sensitivity for red (artificial light), use of smaller apertures (increased depth of field). Disadvantages: graininess which, however, can be improved by special methods of developing, at some cost of speed.
CONVERSION OF SPEED SYSTEMS
ASA & BS
Arith.
(New)*
| ASA
Log
(New)
| DIN
| BS
Log
|
| 3
|
| 6
| 16º
|
| 6
| 1º
| 9
| 19º
|
| 12
| 2º
| 12
| 22º
|
| 25
| 3º
| 15
| 25º
|
| 50
| 4º
| 18
| 28º
|
| 100
| 5º
| 21
| 28º
|
| 200
| 6º
| 24
| 31º
|
| 400
| 7º
| 27
| 37º
|
| 800
| 8º
| 30
| 40º
|
| 1600
| 9º
| 33
| 43º
| | * Also Weston III and later meters.
|
The above speed figures are based on the latest ASA Standard for film speeds (and on the BS and DIN Standards under revision). These figures, when used on the exposure meter, give minimum correct exposures, to make the most of the versatility of the film and of the image quality. They are also the figures quoted by most film manufacturers. Sometimes films are, however, still rated according to earlier standards which in effect incorporated a generous safety factor against under-exposure -- by the simple process of over-exposing films about 100 per cent (well within the exposure latitude of most black-and-white films). So you may come across films apparently only half as fast as others of similar type, because of this difference in ratings. The table on page 42 indicates the current film speeds to be used with the exposure meter, even if the film packing gives a lower rating.
This applies to black-and-white negative materials only; speed rating methods have not changed for colour films.
GRAIN, The picture in the emulsion is formed by silver grains. To the naked eye they form a compact. dark mass, but under the magnifying glass or microscope the separate clumps of grains are visible. Obviously, if the grain of a film is coarse, it will soon become visible on moderate enlarging: and the finer the structure of grain, the more enlarging will it allow without showing any unpleasant granular effect in the print. As a rule, it can be said that the faster the film, the coarser the grain and vice versa. The grain can, to a certain extent, be influenced by development (fine-grain development), correct exposure, paper, etc.
LATITUDE. Latitude is the ability of the film to yield usable negatives, even with a certain amount of under- or over-exposure. Films with wide latitude are likely to have less resolving power, causing loss of definition.
The negative material has a number of additional properties which help towards good results. There is, e.g., a special "protective coating", a hardened gelatine layer on top of the actual sensitive layer which protects against scratches. The base is tinted -- as a rule grey -- in order to avoid reflection of the light coming through the emulsion on to the film-back and thus causing halation.
Colour Film
Beside the films mentioned which reproduce the world around us in black and white, colour films enable us to photograph in natural colours. There are two types.
The first, colour negative film, produces negatives in colour. These resemble ordinary negatives -- the dark parts of the subject are light and vice versa -- and in addition the colours are reversed. Thus blues are yellow or brownish, reds are blue-green, and greens are reddish.
These colour negatives are then printed on a similar kind of material to give colour prints. We can also use these negatives to obtain black-and-white prints.
The second type of colour film, known as reversal colour film, produces positive colour transparencies on the film exposed in the camera. These transparencies can then be viewed by transmitted light or projected through a projector.
While colour negative film is suitable for daylight and artificial light, colour reversal film is made in two separate emulsions, one balanced for daylight, the other for artificial light.
EXPOSING COLOUR FILM. The exposure latitude of colour film is small. It is therefore important to ascertain the exposure time accurately with a reliable photo-electric meter. Under-exposed and over-exposed films not only produce dense or weak results but also the colour values are distorted. Over-exposure produces pale, diluted colours under-exposure gives hard, deep colours.
35 mm. BLACK-AND-WHITE FILMS
| Make
| Speed in
ASA and BS
Arithmetic
| Make
| Speed in
ASA and BS
Arithmetic
|
Adox---
KB 14
KB 17
KB 21
KB 27
UKB-17 Reversal
|
40
80
200
800
80
| Ilford---
Pan F
F.P.3
H.P.3
H.P.S
|
50
125
400
800
|
Agfa---
Isopan FF
Isopan F
Isopan ISS
Isopan Record
|
32
80
200
1250
| Kodak---
Panatomic X
Plus X
Tri-X
|
40
125
400
|
Ansco---
Super Hypan
|
500
| Konica---
Konicapan S
Konicapan SS
Konicapan SSS
|
100
200
400
|
Ferrania---
P 24
P 30
P 33
P 66
|
40
160
320
640
| Orwo---
NP 10
NP 18
NP 22
NP 27
|
8
50
125
400
|
Gevaert---
Gevapan 27
Gevapan 30
Gevapan 33
Gevapan 36
Dia-Direct 26 Reversal
|
64
125
250
500
50
| Perutz---
P 14
P 17
P 21
P 25
Miniature Reversal
|
40
80
200
500
25
|
Hauff---
Pancola Granex
Pancola 17
Pancola 21
Pancola S 25
|
40
80
200
500
| Tura---
Pan 14
Pan 17
Pan 21
Pan 24
|
40
80
200
400
|
| The above film speeds are based on the latest ASA Standard, giving minimum correct exposure to make the most of the films' versatility and image quality. Some manufacturers, however, still quote speeds from the older system which gives more generous exposure. This accounts for any disparity between these tables and the manufacturers' figures.
|
Avoid great contrast such as deep shadows. For photographs in daylight on reversal film use daylight-type film. Use artificial light film when taking pictures indoors by the light of electric lamps or Photofloods. Daylight film may be used in artificial light and vice versa with the special conversion filter recommended by the makers.
Some of these conversion filters for reversal film (Wratten) are supplied in the original filter range for the Retinettes. There is also a Kodak Skylight haze filter for daylight-type film which is used to reduce the blue haze in distant landscape shots. This filter needs no exposure increase. It is also useful for colour photography with electronic flash, producing a somewhat warmer result.
For taking colour pictures by flashlight, on reversal film, use daylight-type film with blue-tinted bulbs or electronic flash.
35 mm. COLOUR FILMS
| Film
| Type
| Speed in
ASA and BS
Arithmetic
| Processing
|
| Negative Films
|
| Agfacolor CN14
| Universal
| 20
| U
|
| Agfacolor CN17
| Universal
| 40
| U
|
| Ferraniacolor N27
| Daylight
| 40
| U
|
| Fujicolor
| Universal
| 32
| M
|
| Gevacolor NS
| Universal
| 25
| L
|
| Ilford Colorprint
| Universal
| 64
| M
|
| Kodacolor
| Universal
| 32
| U
|
| Kodacolor X
| Universal
| 64
| L
|
| Telcolor
| Universal
| 16
| L
|
| Reversal Films
|
| Agfacolor CT18
| Daylight
| 50
| M
|
| Agfacolor CK20
| Artificial light
| 80
| M
|
| Anscochrome 50
| Daylight
| 50
| M
|
| Anscochrome T100
| Artificial light
| 100
| M
|
| Anscochrome 100
| Daylight
| 100
| M
|
| Anscochrome 200
| Artificial light
| 200
| M
|
| Ektachrome E2
| Daylight
| 32
| U
|
| Ektachrome X
| Daylight
| 64
| U
|
| H.S. Ektachrome
| Daylight
| 160
| U
|
| H.S Ektachrome B
| Artificial light
| 125
| U
|
| Ferraniacolor
| Daylight
| 25
| U
|
| Ferraniacolor
| Artificial light
| 20
| U
|
| Ferraniacolor Dia 28
| Daylight
| 50
| M
|
| Fujicolor
| Daylight
| 10
| M
|
| Gevacolor R5
| Daylight
| 40
| M
|
| Ilford Colorslide
| Daylight
| 32
| M
|
| Ilford Super Colorslide
| Daylight
| 64
| M
|
| Kodachrome II
| Daylight
| 25
| M
|
| Kodachrome IIA
| Artificial light
| 40
| M
|
| Kodachrome X
| Daylight
| 64
| M
|
| Konicolor
| Daylight
| 16
| M
|
| Perutz Color C18
| Daylight
| 50
| M
|
| Telcolor
| Daylight
| 50
| M
|
| PROCESSING: M = films can be processed only by the maker; L = films can be processed only by an approved laboratory through a photographic dealer: U = films can be processed by the user by means of special processing kits.
|
DISPLAYING THE COLOUR PICTURE. The colour transparency can be viewed in a variety of transparency viewers. The simplest consist of a magnifying glass set in a frame into which the picture can be inserted. If the viewer is held against a lighted background, the picture appears enlarged and well illuminated. More elaborate viewers have an artificial light source of their own.
The most satisfactory way is to project the transparency in a projector which will throw a large picture on a screen. Finally colour enlargements can be made from transparencies. These cannot show the full tonal range and brilliancy of the projected picture, but are generally acceptable, particularly if the transparency does not show undue contrast range, is correctly exposed and is sharp.
The colour negative can be printed or enlarged directly on colour paper to produce a colour print of any size. Alternatively, the colour negatives can be printed on positive transparency film to produce colour transparencies for viewing or projection in exactly the same way as explained above.
|
The Technique of Focus
The lens is focused at some definite distance. That means that its position relative to the film Is adjusted In such a way that whatever is exactly at the focused distance will be represented by a "sharp" image on the film. Everything else -- everything nearer to the camera or farther from it -- will be, strictly speaking, "unsharp".
In practice the decline of definition is, of course, gradual. Thus there is a zone -- stretching from somewhere in front of the focused distance to somewhere behind it -- which will appear sufficiently sharp to the human eye. This is called depth of field.
Now, what should or should not be accepted as sufficiently sharp is debatable. Certain standards, however, have been agreed upon. It is agreed that any pin-point represented on a 35 mm. negative by a "dot", the diameter of which does not exceed 1/500 in. or 1/20 mm., should be regarded as sharp. The technical term for this is circle of confusion.
The limits defined by the circle of confusion vary with the conditions under which the lens is used:
Small apertures yield more depth of field than large ones.
Far focusing distances yield more depth of field than near focusing distances.
Control of Depth of Field
The depth of field-dependent on the distance actually focused at, the aperture employed and the focal length of the lens -- has to be ascertained from case to case. As the Retinette lenses are not interchangeable, the factor of the focal length need not worry us. There remains the interplay of aperture and focusing distance. Their effect can be read off a depth of field calculator engraved on the front of the shutter of the Retinette I, IA, IB and earlier models.
The automatic Indicators of the Retinette II and IIB models directly show the zone of sharpness on the focusing scale with the distance set to the actual index line; everything is sharp from one pointer to the other. The pointers move in or out automatically when the aperture is varied.
With the Retinette I and earlier models, the depth is read off separately for; each aperture at any given distance setting.
Turn the focusing mount of these Retinette models until one of the figures on the distance scale corresponding to the subject distance (for instance, 8 ft.) is opposite the indicator. Let us assume that we are working at f5.6. The two lines marked 5.6 to either side of the Indicator are now opposite approximately 6 and 11ft. respectively, so our depth of field extends from 6 to 11 ft. When working with the lens set to the same distance but with aperture f3.5, the depth only extends from about 6½ to 9 ft., while at f11 we have a sharp zone extending from just under 5 ft. to nearly 18 ft. Note how we can control the area of sharpness merely by changing the aperture.
So the stop (aperture) is one of the variables by which a convenient zone of sharpness can be obtained. The other one is, of course, the distance setting. Let us watch the index lines leading from, say, aperture f5.6 while we set the distance indicator first at 5 ft., then at 8 ft. and last at 25 ft. We learn that in the first case the depth of field stretches from 4½ ft. to 6 ft.; In the second case from 6 to 10 ft.; and in the last case from 13 ft. to infinity. So we see confirmed that the depth of field grows as we set the lens at distances farther and farther away from the camera -- and incidentally may conclude that the depth of field in front of the focused distance is always more limited than the depth gained behind it.
The comparative shallowness of the depth of field in front of the focused distance will sometimes make it necessary -- e.g., in landscape photography, where the subject may have to include much foreground -- to set the lens nearer than the main point of interest lies, in order to gain additional sharpness towards the foreground while covering the main point of interest by the depth of field behind the focused distance. This trick, however, must be used with moderation. It should be recalled that the widely held idea that everything is equally sharp within the depth of field area and completely unsharp outside its limits is quite wrong. There is a gradual decline of sharpness even within the depth of field area. Critical "pin-point" definition can be expected only in the plane actually focused. So care should be taken to place the focus as near as possible to the spot on which the greatest sharpness is required. Thus in the case of distant landscapes use should not be made of the hyperfocal distance (described on page 42) if the sharpness is required in the far distance; focusing at the far distance will give better results.
When a lens is focused on such a distance that the depth of field just reaches the far distance (Infinity) then the lens is focused on the "infinity-near point" or hyperfocal distance. This adjustment of focus is advisable when it is desired to secure adequate sharpness from the farthest distance to as far as possible in the foreground, rather than extreme sharpness in the far distance only.
DEPTH OF FIELD
The depth of field scale shows clearly how much of the subject will be sharp at any given distance and aperture. The figure opposite the triangular index mark is the focused distance, in this case 25 ft. The figures to either side of the index mark represent aperture settings. For instance, at f5.6 the depth extends from about 13 ft. to infinity. At nearer subject distances the depth of field is reduced: thus at 8 ft. it only extends from about 6 to 11 ft.
The Retinette II and IIB models have an automatic depth of field indicator, consisting of two pointers coupled to the aperture setting. At any aperture, therefore, the pointers directly indicate the depth of field available, and they move outwards at small apertures and inwards at larger ones.
Zone Focusing
The Retinette user will often aim at snapshots by seizing a situation as he comes across it without many preliminaries, certainly without setting up a tripod, and mostly with the least possible loss of time. To attain this he will not only have to know his camera inside out but he also needs a ready-for-shooting lens setting which will yield a sharp picture every time. Such settings are the focusing zones. Here the relatively short focal length of the Retinette lenses scores; it gives the advantage of a comparatively large depth of satisfactory definition even at the more open apertures.
From what was said about depth of field on the previous pages, it is clear that the stop is used to regulate the definition of the picture in depth (both towards foreground and background) from the point at which the lens is actually focused. Now, the idea could occur to the beginner to try to use the smallest stop every time to make sure of sharp pictures. That, however, would mean that in the majority of cases he would not arrive at a practicable exposure time because, while it is true that the smaller the stop the greater the depth of field, it is also true that the smaller the stop the longer the exposure time.
In consequence, the best zone focusing is the compromise between a well-selected medium stop and a suitable distance setting, yielding a fairly extensive zone of definition and still allowing for a reasonably short exposure.
The more frequently used zone focusing settings are set out in the zone focusing table on page 43, and it may be found useful to copy them out on a piece of paper which can be fixed in the top flap of the camera case for ready reference.
The Depth of Field Tables
These tables have been included in this book, in spite of the fact that the Retinettes are fitted with a depth of field calculator, in order to supply perfectly accurate figures which cannot be obtained with the calculator, the distance scale not being calibrated in sufficient detail.
The tables are computed on the assumption that the circle of confusion is of 1/20 mm. diameter. The figures on the left of the table relate to the setting of the lens stop. The bold (middle) figures in each group indicate the distance (in feet) to which the lens is to be set on the helical focusing scale. The corresponding figure above then gives the distance of the near limit (in feet and inches) and the figures below give the far limit (in feet and inches) of the depth of field.
For easy application of the tables with those cameras which have been made for the continental market and consequently have been calibrated in metres, a conversion table is given on page 62.
APPROXIMATE HYPERFOCAL DISTANCES
| (For conversion into metric units, see below)
|
| Stop
| Distance
Setting
| Depth of field
|
|
| from
| to approx.
|
| f2.8
| inf
| inf
| 50 ft.
|
| f4
| inf
| inf
| 37 ft.
|
| f5.6
| inf
| inf
| 25 ft.
|
| f8
| 18 ft.
| inf
| 9 ft.
|
| f11
| 12 ft.
| inf
| 6 ft.
|
| f16
| 9 ft
| inf
| 4½ ft.
|
| f22
| 6 ft.
| inf
| 3 ft.
|
The best way to utilize the hyperfocal distances accurately at larger apertures is to set the infinity mark against the aperture to be used on the depth of field scale. This yields closer limits for the depth than shown below for f2.8, f4 and f5.6.
FOCUSING ZONES
| (For conversion into metric units, see below)
|
| Subject
| Distance
Setting
| Aperture
| Sharp zone
from --- to
|
| Portraits
| 4 ft.
| f8 3¼ ft.
| 5 ft.
|
| Children
| 6 ft.
| f8
| 4¾ ft.
| 9 ft.
|
| Groups (small)
| 10 ft.
| f8
| 6½ ft.
| 20 ft.
|
| Group: (large)
| *15 ft.
| f8
| 8½ ft.
| 80 ft.
|
| Landscapes
| 25 ft.
| f5.6
| 12½ ft.
| inf.
|
| * Marked in red as the most suitable hyperfocal distances setting : the far limit can be taken as being virtually infinity.
|
|
Close-Up Work with the Retinette
While the Retinette cameras focus down to 3½ ft. you can work at still shorter distances with the aid of close-up supplementary lenses or the Kodak close-up rangefinder with supplementary Kodak N-lenses. Thus it becomes possible to cover small objects such as blossoms, insects, coins, etc., and also to copy documents, drawings and the like.
The Retinette Close-up Rangefinder
This is used with specially matched supplementary lenses marked NI and NII.
The close-up rangefinder carries yellow figures on a black background together with the focal length marking 45. It measures the correct near distance, shows on its focusing scale which close-up N lens has to be used, and indicates the distance to which the camera lens must be set to obtain a sharp image. At the same time it shows the correct field of view, free from parallax.
This close-up rangefinder must not be confused with the Retinette close-up rangefinder (marked "50"), which will not give the correct distances with the Retinettes.
The supplementary lenses are also available separately. When working without the close-up rangefinder the distances have to be measured with a rule (see pages 46 to 49).
CLOSE-UP EQUIPMENT
Right: The close-up rangefinder fits into the accessory shoe of the camera and is used with a set of N supplementary lenses (page 44).
|
Left: The table stand is a useful camera support for close-ups. The height of the column is adjustable in the sleeve. A right-angle head can replace the ball-and-socket head to direct the camera rigidly downwards for copying.
|
Right: The frame finder is useful for shots of moving subjects as it permits observation of the subject in natural size. It fits into the accessory shoe and can also be used with the supplementary N-lenses. It incorporates parallax compensation.
|
Using the Close-up Rangefinder
- Attach the close-up rangefinder to the camera.
- Sight the subject.
- Focus close-up rangefinder and attach supplementary lens.
- Focus the camera lens.
- Set stop and speed; check focus.
- Release the shutter.
2. Approach the subject until the required subject area fills the blue-violet finder field. Hold the camera so that the yellow field appears in the centre.
3. Turn the focusing wheel on top of the close-up rangefinder until the subject details in the yellow and blue fields coincide. Note the position of the focusing wheel. There are three separate scales marked respectively with one, two, or three lines for the NI, NII, or NI + NII lenses combined. Attach the corresponding supplementary lens or lenses to the camera lens. When the scale with three lines for the NI + NII lenses is used, screw the NI and NII lenses on top of each other over the camera lens. Filters, if used, should always be mounted in front of the supplementary lens.
4. Set the camera lens to the distance read off the focusing wheel. (This is not the subject distance.)
5. Look through the rangefinder to see if the yellow and blue images still coincide. If they do not, move the whole camera forward or backward, but do not touch the focusing wheel again.
Other Close-up Lenses
As an alternative to the special N lenses, ordinary positive meniscus lenses can also be used. Any photographic dealer or optician can supply a range of meniscus type lenses, to be put into a fitting filter mount. The lenses suggested are +1 diopter, +2 diopters, +3 diopters.
CLOSE-UP FOCUSING FOR +1, +2, +3, DIOPTER LENSES
Set Distance on
Focusing Mount
to:
| With +1 Diopter
Lens, the Distance
from Front of Lens
to subject is:
| With +2 Diopter
Lens, the Distance
from Front of Lens
to subject is:
| With +3 Diopter
Lens, the Distance
from Front of Lens
to subject is:
|
| ft.
| m.
| in.
| cm.
| in.
| cm.
| in.
| cm.
|
| inf.
| inf.
| 39.4
| 100
| 19.7
| 50
| 13.1
| 33
|
| 40
| 20
| 36
| 95
| 19
| 49
| 12.7
| 32.5
|
| 20
| 10
| 33.8
| 90.5
| 18.2
| 47.5
| 12.4
| 32
|
| 13
| 6
| 31
| 85.5
| 17.5
| 46
| 12.1
| 31.5
|
| 10
| 4
| 29.7
| 80
| 16.9
| 44.5
| 11.8
| 31
|
| 8
| 3
| 28
| 75
| 16.7
| 43
| 11.7
| 30
|
| 7
| 2
| 26.9
| 67
| 16.4
| 40
| 11.6
| 28.5
|
| 5
| 1.5
| 23.8
| 60
| 14.9
| 37.5
| 10.8
| 27
|
| 4
| 1.2
| 21.7
| 54.5
| 14
| 35
| 10.3
| 26
|
| 3.5
| 1
| 20.5
| 50
| 13
| 33
| 10
| 25
|
The metric and inch figures in this table are not necessarily exact equivalents; each set of figures does, however, indicate the correct distances for any setting of the corresponding focusing scale. Therefore, always use the distances in centimetres only with the focusing scale settings in metres and the inch measurements with focusing scale settings in feet. (For exact conversions, see page 62.)
The depth of field when working at these short distances is obviously rather limited. The tables on pages 47-49 for the N lenses give an indication of the depth of field under these conditions.
CLOSE-UP FOCUSING WITH THE NI SUPPLEMENTARY LENS
| (For Conversion into metric units, see below)
|
Set Focusing
Scale of
Camera
to (feet)
| Subject
Distance*
(inches)
| Scale of
Reproduction
| Field Size
in Inches
| Depth of Field* in inches at Aperture
|
| f5.6
| f8
| f11
| f16
| f22
|
| from
| to
| from
| to
| from
| to
| from
| to
| from
| to
|
| inf
| 37.37
| 0.058
| 16.75x24.75
| 34.75
| 42.5
| 33.37
| 45.12
| 31.5
| 48.62
| 29.75
| 54.75
| 27.62
| 65.37
|
| 25
| 33.75
| 0.062
| 15x22.75
| 31.12
| 37.87
| 30.37
| 40.62
| 29.87
| 43.5
| 28.37
| 49.5
| 27.12
| 58.25
|
| 15
| 32.5
| 0.066
| 14.37x21.75
| 30.5
| 35.62
| 29.5
| 37
| 28.12
| 39.12
| 27.5
| 44.37
| 26.37
| 53.37
|
| 10
| 30.25
| 0.070
| 13.62x20.5
| 28.37
| 33.5
| 27.12
| 35.25
| 26.37
| 37.37
| 25.25
| 41.12
| 24.25
| 48
|
| 8
| 29.25
| 0.073
| 13x19.37
| 27.5
| 32
| 26.5
| 33.5
| 25.5
| 35
| 24.37
| 38.12
| 22.5
| 43
|
| 7
| 28.37
| 0.076
| 12.5x18.5
| 26
| 30.25
| 25.25
| 31
| 24.25
| 32.75
| 23.12
| 35.5
| 21.62
| 39.75
|
| 6
| 27.12
| 0.078
| 12x17.87
| 25.12
| 28.5
| 24.37
| 29.37
| 23.25
| 31
| 22.37
| 35.62
| 21
| 37.25
|
| 5
| 26
| 0.082
| 11.5x17.25
| 24.12
| 27.75
| 23.5
| 28.62
| 22.75
| 29.87
| 21.62
| 32
| 20.37
| 35.25
|
| 4.5
| 25
| 0.084
| 11.25x16.87
| 23.25
| 26.37
| 22.62
| 27.25
| 21.62
| 28.12
| 20.87
| 30
| 19.75
| 33.37
|
| 4
| 23.75
| 0.089
| 10.75x16.12
| 22.25
| 25
| 21.62
| 25.75
| 21
| 26.62
| 20
| 28.25
| 18.37
| 30.25
|
| 3.5
| 23
| 0.096
| 9.87x14.87
| 21.37
| 23.62
| 20.37
| 24
| 20.12
| 26.12
| 19.75
| 27.62
| 18
| 28.75
|
| * Measured from the subject to the focal plane; this corresponds approximately to the rear upper edge of the camera top.
|
CLOSE-UP FOCUSING WITH THE NII SUPPLEMENTARY LENS
| (For Conversion into metric units, see below)
|
Set Focusing
Scale of
Camera
to (feet)
| Subject
Distance*
(inches)
| Scale of
Reproduction
| Field Size
in Inches
| Depth of Field* in inches at Aperture
|
| f5.6
| f8
| f11
| f16
| f22
|
| from
| to
| from
| to
| from
| to
| from
| to
| from
| to
|
| inf
| 19.62
| 0.112
| 8.5x12.5
| 19
| 20.75
| 18.37
| 21
| 18.25
| 21.75
| 18.12
| 22.37
| 17.37
| 24.25
|
| 25
| 18.62
| 0.119
| 7.87x11.25
| 18.25
| 20
| 17.87
| 20.37
| 17.5
| 20.87
| 17
| 21.87
| 16.37
| 23.12
|
| 15
| 18.25
| 0.123
| 7.75x11.5
| 17.62
| 19.25
| 17.37
| 19.62
| 17.12
| 20.12
| 16.5
| 21
| 16
| 22.12
|
| 10
| 17.62
| 0.127
| 7.62x11.12
| 17
| 18.12
| 16.75
| 18.87
| 16.5
| 19.37
| 16.12
| 20.12
| 15.5
| 21.12
|
| 8
| 17.25
| 0.131
| 7.25x10.87
| 16.62
| 18
| 16.37
| 18.37
| 16
| 18.75
| 15.5
| 19.5
| 15.12
| 20.5
|
| 7
| 17.12
| 0.136
| 6.87x10.5
| 16.37
| 17.62
| 15.87
| 18.12
| 15.75
| 18.5
| 15.37
| 19.25
| 15
| 20.25
|
| 6
| 16.25
| 0.139
| 6.75x10.37
| 16.25
| 17.5
| 15.62
| 18
| 15.5
| 18.37
| 15.25
| 19
| 14.75
| 20
|
| 5
| 16.37
| 0.144
| 6.62x10
| 16
| 17.25
| 15.5
| 17.5
| 15.37
| 18
| 15.12
| 18.62
| 14.5
| 19.5
|
| 4.5
| 16
| 0.147
| 6.5x9.75
| 15.5
| 16.62
| 15.25
| 17
| 15
| 17.25
| 14.62
| 18
| 14.37
| 18.87
|
| 4
| 15.62
| 0.150
| 6.37x9.5
| 14.75
| 16
| 14.62
| 16.12
| 14.37
| 16.62
| 14
| 17.12
| 13.62
| 17.87
|
| 3.5
| 15.25
| 0.155
| 6.12x9.12
| 14.37
| 15.5
| 14.25
| 15.75
| 13.87
| 16.37
| 13.5
| 16.75
| 13.25
| 17.12
|
| * Measured from the subject to the focal plane; this corresponds approximately to the rear upper edge of the camera top.
|
CLOSE-UP FOCUSING WITH THE NI AND NII LENSES COMBINED
| (For Conversion into metric units, see below)
|
Set Focusing
Scale of
Camera
to (feet)
| Subject
Distance*
(inches)
| Scale of
Reproduction
| Field Size
in Inches
| Depth of Field* in inches at Aperture
|
| f5.6
| f8
| f11
| f16
| f22
|
| from
| to
| from
| to
| from
| to
| from
| to
| from
| to
|
| inf
| 14.62
| 0.163
| 5.75x8.5
| 14
| 14.87
| 13.75
| 15.12
| 13.5
| 15.25
| 13.25
| 15.62
| 13
| 16.25
|
| 25
| 14.12
| 0.175
| 5.37x8.25
| 13.75
| 14.62
| 13.62
| 14.75
| 13.37
| 15
| 13.12
| 15.5
| 12.75
| 16
|
| 15
| 13.75
| 0.178
| 5.25x8.12
| 13.37
| 14.12
| 13.25
| 14.25
| 13
| 14.5
| 12.62
| 15
| 12.5
| 15.37
|
| 10
| 13.5
| 0.182
| 5.12x7.87
| 13.25
| 14
| 13
| 14.12
| 12.75
| 14.25
| 12.5
| 14.75
| 12.25
| 15.12
|
| 8
| 13.37
| 0.185
| 5.12x7.75
| 13.12
| 13.75
| 12.87
| 13.87
| 12.62
| 14.12
| 12.37
| 14.62
| 12.12
| 15
|
| 7
| 13.25
| 0.187
| 5.12x7.62
| 13
| 13.5
| 12.75
| 13.75
| 12.5
| 14
| 12.37
| 14.37
| 12
| 14.75
|
| 6
| 13.12
| 0.189
| 5x7.5
| 12.75
| 13.37
| 12.62
| 13.5
| 12.37
| 13.75
| 12.25
| 14.12
| 11.87
| 14.5
|
| 5
| 12.75
| 0.195
| 4.87x7.25
| 12.62
| 13.25
| 12.37
| 13.37
| 12.25
| 13.5
| 12.12
| 13.87
| 11.75
| 14.25
|
| 4.5
| 12.62
| 0.199
| 4.87x7.12
| 12.5
| 13
| 12.25
| 13.12
| 12
| 13.37
| 11.87
| 13.62
| 11.62
| 14
|
| 4
| 12.5
| 0.204
| 4.75x6.87
| 12.37
| 12.75
| 12.12
| 13
| 11.87
| 13.25
| 11.37
| 13.5
| 11.5
| 13.75
|
| 3.5
| 12.25
| 0.211
| 4.5x6.75
| 12.12
| 12.37
| 12
| 12.62
| 11.75
| 13.12
| 11.25
| 13
| 11
| 13.5
|
| * Measured from the subject to the focal plane; this corresponds approximately to the rear upper edge of the camera top.
|
The Table Stand
The table stand is designed for close-up subjects which allow or need longer exposure times as well as for all types of close-ups where quick setting up and absolute steadiness of the camera are important.
The stand consists of a U-shaped base with an adjustable column and a ball and socket head. The stand can be taken to pieces for easy transport and storage. It is specially useful for close-ups with the close-up N lenses, with or without the close-up rangefinder.
A right-angle head is available for the table stand for mounting the camera so that it mounts vertically downwards for copying.
|
The Technique of Exposure
The correct exposure time depends on two factors:
(1) The amount and colour of light reflected from the object to be photographed. This in its turn depends on the season of the year, the time of day, situation, weather, etc.
(2) The speed of film, filter, and lens stop employed. The correct exposure time can be ascertained with:
EXPOSURE TABLES. These are based on mathematical calculations and practical experience. Such a table is given on page 52. The Focal Exposure Chart represents the most up-to-date quick working version of an exposure table.
OPTICAL EXPOSURE METERS. measure, with the aid of the eye, the amount of light reflected. If used consistently and with care, they will give exposure figures well within the latitude of the film.
PHOTO-ELECTRIC EXPOSURE METERS. They are the most accurate and dependable means available for arriving at the right exposure time.
A photo-electric exposure meter is built into the Retinette IIA and IIB cameras.
The Built-in Meter of the Retinette IB and IIA
The exposure meter of the Retinette IB and IIA is coupled to the speed and aperture setting of the shutter (p. 12).
- Set film speed.
- Set shutter for daylight operation.
- Aim camera and set exposure.
- Set the film speed on the shutter in ASA or DIN.
- Turn the shutter ring on Retinette IIA so that the "sun" symbol lies against the black index mark. On Retinette IB set the ring to the required speed e.g. 1/60 for general outdoor work.
- Looking through the viewfinder, a bright triangle is visible below the frame lines. On Retinette IIA turn the shutter rim (on Retinette IB the aperture scale knob) to align the black pointer, also visible, with the triangle. Exposure is now set and no further adjustment is needed. To adjust for filters, see page 58.
In extreme conditions of lighting the triangle disappears on turning the shutter rim. This indicates that no picture is obtainable in the prevailing light.
DAYLIGHT EXPOSURES
| Add the respective figures in Tables 1,2 and 3. The sum is the light value to be set on the shutter. For Retinette models without light value scale convert the light value to apertures and speeds with Table 4. (Set the shutter to the nearest marked speed if necessary -- e.g., 1/25 for 1/30, and so on.)
|
| 1. Subject and Weather
|
| Subject
| Clear
Sun
| Cloudy
Light
| Cloudy
Medium
| Dull
|
| Distant landscape
| 13
| 12
| 11
| 10
|
| Landscape, light foreground
| 12
| 11
| 10
| 9
|
| Open streets, light buildings
| 11
| 10
| 9
| 8
|
| Figures and groups in the open
| 10
| 9
| 8
| 7
|
| Figures and groups in the shade
| 9
| 8
| 7
| 6
|
| Average Interiors
| 3
| 2
| 1
| 0
|
| 2. Month and Time
|
|
| A.M.---P.M.
| April
to Aug.
| Sept., Oct.,
Feb., Mar.
| Nov.
to Jan.
|
|
| 11 to 2
| 3
| 3
| 2
|
|
| 9-11 to 2-4
| 3
| 2
| 1
|
|
| 7-9 to to 4-6
| 2
| 0
| --
|
|
| 3. Film Speed
|
|
|
|
| ASA
|
|
|
|
|
| 25
| -1
|
|
|
|
| 50
| 0
|
|
|
|
| 100
| +1
|
|
|
|
| 200
| +2
|
| 4. Light Values (Sum of Tables 1+2+3) and Exposures
|
| L.V.
| f2.8
| f4
| f5.6
| f8
| f11
| f16
| f22
|
| 3
| 1
| 2s
| 4s
| 8s
| 15s
| 30s
| 60s
|
| 4
| 1/2
| 1
| 2s
| 4s
| 8s
| 15s
| 30s
|
| 5
| 1/4
| 1/2
| 1
| 2s
| 4s
| 8s
| 15s
|
| 6
| 1/8
| 1/4
| 1/2
| 1
| 2s
| 4s
| 8s
|
| 7
| 1/15
| 1/8
| 1/4
| 1/2
| 1
| 2s
| 4s
|
| 8
| 1/30
| 1/15
| 1/8
| 1/4
| 1/2
| 1
| 2s
|
| 9
| 1/60
| 1/30
| 1/15
| 1/8
| 1/4
| 1/2
| 1
|
| 10
| 1/125
| 1/60
| 1/30
| 1/15
| 1/8
| 1/4
| 1/2
|
| 11
| 1/250
| 1/125
| 1/60
| 1/30
| 1/15
| 1/8
| 1/4
|
| 12
| 1/500
| 1/250
| 1/125
| 1/60
| 1/30
| 1/15
| 1/8
|
| 13
| --
| 1/500
| 1/250
| 1/125
| 1/60
| 1/30
| 1/15
|
| 14
| --
| --
| 1/500
| 1/250
| 1/125
| 1/60
| 1/30
|
| 15
| --
| --
| --
| 1/500
| 1/250
| 1/125
| 1/60
|
| 16
| --
| --
| --
| --
| 1/500
| 1/250
| 1/125
|
The Built-in Exposure Meter of the Retinette IIB
The Retinette IIB is fitted with a built-in exposure meter which gives the correct light value (see page 10). To use the meter:
- Set film speed.
- Point camera to subject.
- Turn setting ring to coincide yellow and white pointer.
- Read off light value.
- Transfer light value to shutter.
- Turn the inner disc of the exposure meter knob by the small knob near its circumference until the speed of the film used points to the arrowhead for the appropriate DIN or ASA value. (For film speed, see pages 31-32).
- See page 54. Make sure that the honeycomb meter window is not obscured by a finger.
- The white needle will move in the cut-out window (between body release and exposure meter wheel). Turn the meter setting ring (the outer milled ring of the exposure meter knob) until the yellow pointer lies exactly over the top of the white needle.
- Now read off the light value number opposite the red triangle on the inner disc of the exposure meter knob. If the triangle points to a position between two numbers, set the intermediate light value. For example. if the triangle points between 8 and 9, use 8.5 for greatest accuracy.
- Transfer the light value found with the meter to the shutter as described on page 10.
Exposure Meters in Practice
To get the best results an exposure meter has to be used intelligently. This may look like a contradiction, since we have already said that it is an accurate light measuring instrument. But light from all parts of the subject-highlights, shadows and middle tones -- falls on the meter; so the reading it gives us is an average one for the whole subject area.
Meters are scaled to suit typically average subjects -- i.e., subjects with average areas of light, dark and middle tones. So if you point the meter at a subject of this kind, the exposure reading will be correct.
But if the subject is not average -- if there are large highlight areas and little shadow, or large shadow areas with few highlights -- then you have to modify the exposure reading to obtain the best results.
So there is more to using a meter than just pointing it at the subject and accepting without question the reading indicated.
REFLECTED LIGHT MEASUREMENT. The usual method of using a meter is to point it directly at the subject. The light reaching the photo-electric cell is therefore that reflected by the subject, so this method is called "reflected light measurement".
This gives the correct exposure reading provided the subject has an average mixture of highlights, shadows and middle tones. But if there is a large bright area, or a large dark area, the best method is to go near to the main subject and take a close-up reading. For example, if the subject is a figure against a white or dark background. by going closer you will reduce the amount of background affecting the meter and therefore get a reading in terms of a more average subject, which is what you want.
For some subjects you can take a reading from really close up, aiming the meter at the part of the subject that you want to make sure has optimum exposure. For instance, many photographers take a close-up reading of the sitter's face in portraiture; out-of-doors you can take the reading from the back of your hand instead of going up to the subject.
If you cannot go close up to a subject that needs a close-up reading, then try to find something near at hand that is similar in tone to the subject, and take a reading from this.
When taking readings of general scenes, including a good deal of sky, you have to tilt the meter down slightly to reduce the area of sky "seen" by the meter. The sky is a bright highlight, and by tipping the meter down to exclude some of it, the subject becomes "average" in tone range.
Open views, such as distant landscapes, usually have very light shadows, so you can give a shorter exposure than the meter indicates. It is usual to give half the exposure -- i.e., use double the shutter speed, or use one stop smaller.
INCIDENT LIGHT MEASUREMENT. Another method of assessing exposure is to measure the strength of the light falling on the subject instead of that reflected by it. But if you point the meter straight at the light you get a much higher reading than if you point it at the subject. So the light has to be cut down for the meter to indicate the correct exposure. This is done by placing a white diffuser over the cell, and is designed to reduce the light just the right amount. It also serves another important purpose, and this is to ensure that the meter includes all the light falling on the subject over an angle of almost a full 180º.
The incident light method is particularly useful for reversal colour films, and for subjects with contrasting backgrounds when it is impossible to make a close-up reading.
To take a reading, the method is simply to turn your back on the subject and point the meter in exactly the opposite direction. If the main light -- say the sun -- is coming from the side, don't just partly turn round and point the meter at this; turn round completely, and let the main light strike the meter at the same angle that it strikes the subject.
If the light on the subject is different from that on yourself at the camera position (say if the subject is in the shade, and you are in the sun), you must then go up to the subject and take the reading, pointing the meter towards the camera position.
AGAINST THE LIGHT subjects are extreme cases of non-average tone range. The main lighting becomes a very bright highlight in the field of view, so if you point the meter straight at the subject it will indicate too short an exposure and give you a silhouette effect in the final picture.
This is all right if you want a silhouette. But if you want correct exposure for the subject. you should either take a close-up reading. or take a reading from the camera position and give four to eight times the exposure indicated. Another way is to use the incident light diffuser on the meter, pointing it towards the subject from the camera position, and then double the exposure indicated.
COLOUR FILMS have little exposure latitude, so particularly careful reading is advisable. The meter is used in the same way as for black-and-white films, although the incident light method is often considered best for reversal films. This is because exposure of these should be based on the highlights, and the diffuser itself constitutes a highlight, with the meter in effect reading directly from it.
Because of the importance of the highlights, if you are using a meter without diffuser from the camera position for an against the light shot, it is best to only double the reading, and not multiply it four to eight times as recommended for black-and-white negative films.
THE EXPOSURE METER OF THE RETINETTE IIB
Left: The Retinette IIB has a photo-electric exposure meter built- In. On the top is a setting knob with an inner disc for setting film speeds. Next to it, a meter needle is visible in a window, together with a setting pointer operated by the setting knob. The top of the front panel of the camera carries the honey-comb window, behind which lies the photo electric cell.

Above: Set film speed (top left), point camera at subject (top centre), move setting ring until setting pointer coincides with meter needle (top right), read off light value (bottom left), and set shutter accordingly (bottom right).
Right: Reflected light readings (top) measure the light reflected from the subject. Incident light readings (bottom) measure the light actually falling on the subject. In this case the meter is pointed at the camera position from the subject, and an incident light attachment placed over the cell.
The Use of Filters
The photographic black-and-white film, even when panchromatic, fails to render colours in their true black-and-white tone values, so that the photograph often gives quite a false impression of the real scene. The following is the explanation of this discrepancy.
Scientifically speaking, to the human eye yellow appears to be approximately over ten times as bright as blue, three times as bright as red, and one and a half times as bright as green. The average panchromatic film (page 31), however, registers blue with a brilliance of about four-fifths that of yellow, green with one-third, and red with two-thirds of the brightness of yellow.
It is, therefore, evident that in order to obtain a colour rendering which will correspond with some degree of accuracy to impression of colours as perceived by our eye the photographic sensitivity of the various colours compared with each other will have to be corrected. This can be achieved by the use of filters.
Filters are intended to control on our negative material the varying degrees of brightness. They lighten objects of their own colour and darken those of their complementary colour (e.g., a yellow filter will darken the blue of the sky). They may be used to obtain a colour rendering in our picture which corresponds more closely to the impression made upon our eye by the object : so we speak of "correction filters". Filters may also be employed to emphasise certain effects regardless of whether such emphasis is scientifically correct or not; for instance, our picture can be made to show heavy clouds against a particularly dark sky, whereas the actual landscape revealed only light clouds in a blue sky. Filters for such ends are termed "effect filters".
All filters cut out some part of the light and thus, as a compensation, an increase in exposure time is necessary when using them. Exact figures can only be given for each particular case, for the exposure ratio depends not only on the nature of the filter but also on the colour sensitivity of the film and on the colour of the prevailing light (page 58).
The Retinettes take 32 mm. screw-in filters (32 mm is in this case the outside diameter).
The following list gives a summary of the filters recommended and a short explanation of their use. The Focal Filter Chart gives all filter data fully and at a glance.
YELLOW FILTERS reduce the actinic effect of blue, rendering it darker and are, therefore, particularly suitable for landscape photography in order to obtain clearly defined cloud effects on a normal blue sky. In the case of a very light blue sky, use a darker filter and vice versa.
YELLOW-GREEN FILTERS give an effect similar to that of yellow filters, but also hold back red (render it darker), to which some panchromatic films are comparatively over-sensitive (photographing it too light).
ULTRA VIOLET FILTERS are only to be employed at heights of 6,500ft. (2,000 m.) above sea level and over to avoid an unduly dark sky such as would be obtained by using a yellow filter. At the same time they absorb the ultra-violet rays of high altitudes for which the lens is not corrected and which would reduce the definition.
ORANGE FILTERS give over-correction, and serve, therefore, as an "effect" filter for depicting heavy clouds against a dark sky, and very clear distances in landscapes, eliminating light haze, etc.
RED FILTERS are of still stronger effect than the orange filter, for extreme contrast, creating black sky with brilliant clouds, faking sunshine into moonlight effects, etc.
BLUE FILTERS are for panchromatic film in artificial light. They absorb part of the red sensitivity. This results in better skin-tones.
For filters for colour photography, see page 35.
FILTERS AND FACTORS
| Filter
| Filter
Code
| Factor
| Reduce Light
Value Setting
by
| Reduced film
speed on
Retinette IIA
by graduations
|
| Light Yellow
| F I
| 1½x
| ½
| 2
|
| Medium yellow
| F II
| 2x
| 1
| 3
|
| Yellow green
| F III
| 2x
| 1
| 3
|
| Orange
| F IV
| 3x
| 1½
| 5
|
| Red
| F V
| 7x
| 3 (2¾)
| 9
|
| Blue
| F VI
| 2½
| 1½ (1¼)
| 2
|
| Ultra-violet
| --
| --
| --
| --
|
| Polarizing Filter
| --
| 2½
| 1½ (1¼)
| 2
|
Filter factor compensation on Retinette IIA
The filter factor is allowed for on the Retinette IIA by reducing the film speed setting before taking the measurement with the exposure meter (page 51), by the number of graduations indicated in the table above.
Polarizing Filter
It suppresses light reflections from glass, china, enamel, polished wooden surfaces, water, etc. (but not metals), and is most effective at an angle of about 35º to the reflecting surface. This filter will prove particularly useful when taking shop windows, furniture, for photography of wet objects, etc.
The filter has to be rotated in front of the eye, to find out its best position on the lens, and to be put on the camera lens in this position. The exposure time should be Increased, the factor being about 2½ times (light value reduction 1½).
|
Flash with the Retinettes
Flash is an efficient light source where no or insufficient daylight is available, such as at night, indoors, etc. In the flashlight you carry your own private "sun", with which you can illuminate your subject at any time and place.
The flash bulb is similar to a small electric bulb However when current passes through it, it lights up in an intense flash lasting usually about 1/25 to 1/50 sec. Each bulb will flash only once and has to be discarded afterwards.
The flash bulb is inserted in a flash gun, the current of its battery fires the bulb, while a reflector fixed behind the bulb makes sure that all the light is directed towards the subject. The light is strong enough to allow medium to small apertures to be used for the exposure. The shutter speed -- provided it is slower than 1/30 sec. -- has no effect on exposure, since the flash is shorter than the exposure time.
ELECTRONIC FLASH UNITS utilize the discharge of a high-tension capacitor through a flash tube. The power is derived from an accumulator or battery (there are also models working from the mains electricity supply). The electronic flash outfit is rather bigger and heavier than the flash bulb outfit, its comparative light output is lower and its initial cost higher. On the other hand, anything from 10,000 to 25,000 flashes are obtained from one tube. The flash duration is extremely short (1/500 to 1/2,000 sec.) and will arrest the fastest movements.
How to Use Flash
The shutter of the Retinettes is internally synchronized for flash. It fires the flash at the moment the shutter is fully open. This permits flash shots with shutter settings up to 1/30 sec. for all ordinary (M-class) flash bulbs.
With electronic flash units any speed up to 1/500 sec. can be set.
With the Retinette IIA Prontomat, ordinary flash bulbs and electronic flash may be used. For setting see page 12.
The Prontor SV and S shutter fitted to Retinette models made between 1951 and 1953 has adjustable synchronization, controlled by a lever next to the flash socket. When this lever is set to the red dot marked X, the shutter is synchronized in the same way as the Compur-Rapid.
An alternative synchronization is available by setting the lever to the yellow dot marked M, and moving the self-timer lever to the yellow dot marked M on the front of the shutter. At this setting, flash bulbs are synchronized at all speeds up to 1/300 sec. The M setting is not, however, suitable for electronic flash.
The flash gun is connected by a cable to the flash socket (which on early Retinettes is on the shutter; on the latest models in the top left corner of the front panel of the camera). The flash unit itself is fitted to the accessory shoe of the camera or alternatively can be connected to the camera base by means of a bracket.
On releasing the shutter an electric circuit automatically closes when the shutter is fully open, setting off the flash at this very moment.
When using the built-in self-timer (V setting, see page 10), the flash synchronization still remains in action.
The Correct Aperture
The correct aperture to use with some of the more common flash bulbs is shown on page 61. It assumes they are used in an efficient reflector in a room of average brightness and with a shutter speed up to 1/30 sec. with 80-120 ASA film.
In bright rooms, or with films faster than 120 ASA, use the next smaller aperture. In very large rooms, at night outdoors, or with 40-60 ASA film use next larger aperture.
The Focal Flash Chart is a simple and convenient ready means of reading off the correct aperture to use for any flash bulb at any distance, shutter setting and film speed and shows typical flash set-ups.
Guide Numbers
There is a convenient way of working out exposures with flash, and this is by means of a guide number. When you buy flash bulbs you will always find the guide number for any speed of film printed on the packet.
To find the correct aperture to use, divide the guide number by the distance between the flash and the subject. For instance, suppose you find that the guide number of the bulb with the film in use is 160. If you then want to take a photograph at a distance of 10 ft. from the subject, divide 160/10 = 16. Therefore, the correct aperture to use is f16. Alternatively, if you want to use an aperture of f8 for any reason, then the correct flash distance is 160/8 = 20. So the flash must be 20 ft. from the subject.
APERTURES WITH CLEAR FLASH BULBS
| Distance
| G.E.,
Mazda,
G.E.C. No. 1
Philips:
PF 1
AG1
| Mazda,
G.E.,
G.E.C.:
No. 5
Philips:
PF 5
Sylvania:
Press 25
| Philips:
PF38
Sylvania:
Press 40
G.E.:
No. 11
| Philips:
PF 60
G.E.:
No. 22
Sylvania:
No. 2
|
| 6 ft. (2m.)
| 16
| --
| --
| --
|
| 8 ft (2.5m.)
| 12.5
| --
| --
| --
|
| 10 ft (3m.)
| 10
| 16
| --
| --
|
| 12 ft. (3.6m.)
| 8
| 16
| 16
| --
|
| 15 ft. (4.5m.)
| 6.3
| 11
| 12.5
| 16
|
| 20 ft. (6m.)
| 4.5
| 8
| 10
| 12.5
|
| 25 ft. (7.5m.)
| 4
| 6.3
| 8
| 11
|
| 30 ft. (9m.)
| 3.5
| 5.6
| 6.3
| 9
|
| In bright rooms (kitchen, bathroom) or with films faster than 100 ASA, use next smaller aperture. In very large rooms, at night outdoors or with slower 40-64 ASA film use next larger aperture.
|
APERTURES WITH BLUE FLASH BULBS
| (For 32 ASA Daylight Type Reversal Colour Film)
|
| Distance
| PF 1/B
No. 1B
AG 1B
| PF 60/97
No. 22B
|
| 3½ ft. (1m.)
| f16
| --
|
| 5 ft. (1.5m.)
| f11
| f22
|
| 7 ft. (2.2m.)
| f8
| f16
|
| 10 ft. (3m.)
| f5.6
| f11
|
CONVERSION OF FEET AND INCHES INTO METRIC UNITS
| Many cameras are marked only in either the metric or British system, while most of the tables in this book are also given only in one system. The table below shows at a glance equivalent lengths.
|
| British to Metric
| Metric to British
|
| 1/8 in.
| 0.32 cm.
| 0.5 cm.
| 3/16 in.
|
| 1/4 in.
| 0.64 cm.
| 1 cm.
| 3/8 in.
|
| 1/2 in.
| 1.27 cm.
| 2 cm.
| 13/16 in.
|
| 1 in.
| 2.54 cm.
| 3 cm.
| 1 3/16 in.
|
| 2 in.
| 5.08 cm.
| 4 cm.
| 1 9/16 in.
|
| 3 in.
| 7.62 cm.
| 5 cm.
| 1 15/16 in.
|
| 4 in.
| 10.2 cm.
| 6 cm.
| 2 3/8 in.
|
| 5 in.
| 12.7 cm.
| 7 cm.
| 2 3/4 in.
|
| 6 in.
| 15.2 cm.
| 8 cm.
| 3 1/8 in.
|
| 7 in.
| 17.8 cm.
| 9 cm.
| 3 1/2 in.
|
| 8 in.
| 20.3 cm.
| 10 cm.
| 3 15/16 in.
|
| 9 in.
| 22.9 cm.
| 12 cm.
| 4 3/4 in.
|
| 10 in.
| 25.4 cm.
| 15 cm.
| 5 7/8 in.
|
| 11 in.
| 27.9 cm.
| 20 cm.
| 7 7/8 in.
|
| 1 ft.
| 30.5 cm.
| 25 cm.
| 9 13/16 in.
|
| 2 ft.
| 61 cm.
| 30 cm.
| 11 3/4 in.
|
| 3 ft.
| 91.4 cm.
| 40 cm.
| 15 3/4 in.
|
| 4 ft.
| 1.22 m.
| 50 cm.
| 19 3/4 in.
|
| 5 ft.
| 1.52 m.
| 60 cm.
| 23 5/8 in.
|
| 6 ft.
| 1.83 m.
| 80 cm.
| 31 1/2 in.
|
| 7 ft.
| 2.13 m.
| 100 cm.
| 39 1/2 in.
|
| 8 ft.
| 2.44 m.
| 1.5 m.
| 4 ft. 11 in.
|
| 9 ft.
| 2.74 m.
| 2 m.
| 6 ft. 7 in.
|
| 10 ft.
| 3.05 m.
| 2.5 m.
| 8 ft. 3 in.
|
| 15 ft.
| 4.57 m.
| 3 m.
| 9 ft. 10 in.
|
| 20 ft.
| 6.10 m.
| 4 m.
| 13 ft. 2 in.
|
| 30 ft.
| 9.14 m.
| 5 m.
| 16 ft. 5 in.
|
| 40 ft.
| 12.20 m.
| 10 m.
| 33 ft. 0 in.
|
| 50 ft.
| 15.24 m.
| 15 m.
| 49 ft. 2 in.
|
| 100 ft.
| 30.48 m.
| 20 m.
| 66 ft. 0 in.
|
|
Download this guide
 The Retinette Guide (1965 edition) - Acrobat PDF [395 kB]
More Focal Press Guides
The Retina Guide (1965 edition)
The Retina Reflex Guide (1970 edition)
|
You may copy and print this document or parts of this document for your own personal use. You may not, however, reprint or republish this work, in whole or in part, without prior permission from me, Mischa Koning. Such republication includes inclusion of this work in other Web sites, Web pages, FTP archives, books, magazines or other periodicals, CD-ROM and DVD-ROM compilations or any other form of publication or distribution.
|
|