Reloading the Instamatic 126 Cartridge
These are some thoughts on the above, prompted by a couple of eMails on the subject.
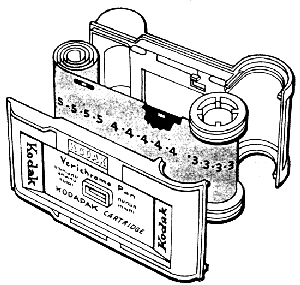
These outlined procedures assume a working knowledge of handling roll-film in a darkroom situation and that you'll almost certainly be processing the film yourself. It is also assumed that, at least by careful examination of an existing loaded cartridge, you are aware of how the film is loaded into the cartridge. One might also reasonably assume that anyone keen enough to want to continue using an Instamatic camera has a reasonably sophisticated instrument, which, by definition, probably has the capability of sensing the film speed from the notch on the cartridge. Consideration may therefore be given to either the choice of film-speed to be loaded or the modification of the notch to match the chosen emulsion. This will obviously have to be within the original film-speed capability specifications of the camera in question. Unfortunately I have insufficient different speed 126 cartridges to be able to ascertain what parameters pertain to this notch. Maybe someone somewhere has this information and is willing to share it, or perhaps modify a cartridge or two and compare meter readings to confirm the dimensions.
 126 Film Speed Sensing
First a quick overview of how the speed sensing system works.
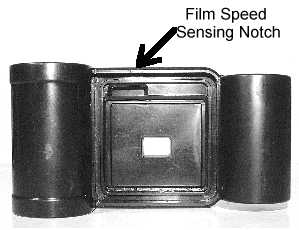
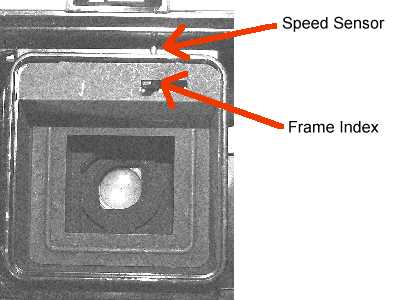
On the 126 film cartridge the film speed can be sensed, by a camera suitably equipped, from a notch in the upper front edge of the cartridge. This notch varies in position for different film speeds. The sensor is in the groove above the film gate on most cameras (where the film runs from left to right). I believe some (non-Kodak) cameras operate "in reverse", in which case any film sensor would be under the film gate. More sophisticated cameras, such as the Kodak Instamatic 500, 700 range, 800 range and X-90, are able to sense a range of speeds, as the sensor runs from right to left as the back of the camera closes, (25-800ASA is mentioned in the Instamatic 804 handbook), less complex cameras simply have a "low speed -- high speed" sensor, nominally 160ASA when depressed, 64ASA when out, as indeed the Instamatic Reflex has, not to be confused with the frame indexing pin, as shown in the lower picture.
Worth a try?
So, is it possible? Theoretically ... yes...
.... however, in practice, unless you're really keen, probably not :o(
The stumbling block is the single index hole every frame that all Instamatic cameras require, at least to "know" when to stop winding and often to re-initialise the shutter as well.
Requirements:
- A supply of cartridges, obviously, carefully opened to remove the existing, presumably exposed, but possibly extremely outdated film. It is usually possible to split the cartridge along the original seam at the take-up spool end so it can be pried apart sufficiently to remove the spool, with existing film, without actually breaking the plastic. There is no supply spool in the 126 cartridge, the un-exposed film simply lying coiled in the supply chamber. The cartridges will need to be re-sealed, once reloaded, for light-proofing, probably using appropriate tape, as re-glueing them will limit their re-useability.

- A supply of suitably numbered and perforated backing paper. This may (should?) have been recovered in step 1 when the original film was processed, but can only probably be re-used a limited number of times, as the repeated attachment of adhesive tape for the purposes of fastening the film will eventually damage it beyond use.

- A supply of suitably perforated 35mm wide film. Unfortunately "normal" 35mm film is not suitable for the purpose, as the sprocket holes don't line up symmetrically with the original perforations on 126 film. Also, the sprocket holes on the opposite edge will intrude completely into the frame of a 126 negative. So, film will probably have to be cut from larger stock, such as 120, (see my page Modifying 120 Film for 828 Cameras for ideas). Ensure that the original edge of the film becomes the perforated edge in the 126 cartridge, so the edge markings don't intrude on your images. At this point you have two basic options ... either remove the film from it's backing paper, cut it to length and attach it to the 126 backing paper, then perforate it, using the 126 backing paper as a template ... or leave the film attached to the original backing paper, again cut it to length, re-numerate it if required and perforate to suit. A third option may be to remove the film from the backing paper and store this in a light-proof place, then perforate and enumerate the backing paper in the light. Back in the dark, the film could be then re-attached and perforated using the pre-punched backing paper as a template. Bear in mind that all this film handling is conducted in total darkness!
- The actual reloading of the cartridge can possibly be achieved in two ways. Firstly, by simply pushing the film + backing paper through the gap made when the spool was initially removed, though I very much doubt it will be possible to coax a 24-exposure length to coil up neatly in the supply chamber, so this method will probably be limited to rather shorter lengths. Secondly, pry the supply chamber apart sufficiently to insert a pre-coiled length of film, pushing the paper leader through the cartridge for subsequent attachment to the take-up spool. Note, I have made no suggestion of completely splitting the cartridge into it's two component parts. Whilst this may be possible with some cartridges, (and if so I'd like to know which ones), it is my experience that the central part of the cartridge is quite fragile and is most likely to snap completely if subjected to excess force.
As you have no doubt surmised, for an occasional cartridge of film, the effort required is probably going to be rather excessive, but should you contemplate long-term reasonable usage of the format, and have (or know someone who has) the expertise to build some kind of perforating jig that would be relatively easy to use in the dark, I could anticipate cutting down 120 film to suit to be a practical option. I have two concepts of this jig, one would be a simple "linear" device which comprised little more than a film guide and a punch guide, for the index hole, with some means of establishing hole spacing, (approximately 31.5mm/1.25 inches), the other (more sophisticated?) version would comprise a roller, the circumference of which equated to the hole spacing and on the edge of which was a punch. With a suitable feed-wheel system or pressure roller, a film guide and a crank handle, one could simply feed the prepared film in, turn the crank a couple of dozen times and end up with perfectly perforated film. You might wish to consider some means of numbering the frames, but bearing in mind this is all conducted in the dark, that may be a little optimistic. The frame spacing is not too critical, provided the frames are not too close together, so if measuring to the nearest 1/32" or millimetre, err on the side of wider rather than smaller. The index hole probably does not have to be square, a suitably sized and positioned round hole will almost certainly be adequate for almost all cameras and it will probably be easier to manufacture a punch mechanism to provide a round hole. A sacrificed film cartridge could probably be modified for use as a film guide to provide good registration between the film and backing paper, both for the punching of holes and the possible writing of frame numbers.
Alternative way of reloading the cartridges
Update: summer 2008
Bruce Miller sent me the following reloading instructions, which seems to be easier than my instructions above. I haven't tried this myself yet but I really should!
Separate the two halves of the cartridge completely. Then carefully cut along the take up seams and supply seams with a razor blade. Then simply pry the cartridge at the 4 weld spots in the "fragile" middle.
Then discard the backing and load with standard 35 mm film. Tape the cartridge shut with artist black masking tape and cover the counter window on the cartridge and the back of the camera.
Winding the reloaded film is easy for most simple Kodaks (100, 104, 300, R4 and others)
- Before loading, press the shutter button to click the shutter.
- After loading, press and hold the button down.
- Wind twice.
- Release the button, you will hear a click as the index pin pops into the nearest perforation.
- Wind gently and partially until it stops. This may only be a very short winding distance.
- Let the winding knob snap back into its normal place.
- The shutter is cocked and you are ready to shoot.
Buying film
I have no doubt that the majority of readers will find all the above a little too complicated, in which case the only option is to buy film, still available (September 2001) from Ferrania in Italy under their Solaris brand. This is distributed in Canada by Continent-Wide Enterprises Limited, I believe in minimum quantities of 30. They can be contacted here. Smaller quantities are available from Film for Classics and The Frugal Photographer. Swains International plc are distributing this film in the UK through the Camera Shop and Photo Chemist retail outlets, product code 1912. I have no other details. Please bear in mind that many processors may no longer be able to print the full square frame of the 126 negative, so you may wish to research your options before ordering. The contact details for these shops can be found in the finding film section on this website.
When you have any further thoughts on this subject and, especially, of any success using these or any other methods, please contact me and let me know.
|

