|
1 2 6 c a r t r i d g e p i n h o l e
|
The page below is as supplied to me by Eastman Kodak once they had withdrawn it from their website when they announced their discontinuation of 126 film. There are however other sources of 126 film, check the hints'n'tips for their contact details.

Cartridge Pinhole Camera
A cartridge pinhole camera is very easy to use because you can load and unload the camera in daylight, make at least 12 pictures without changing the cartridge, and have your photo dealer process the film. With a can or box pinhole camera, you must cut the film, load and unload the camera in a darkroom, reload the camera after each picture, and process the film yourself.
Materials
Here are the materials you will need to make a cartridge pinhole camera:
- 1 cartridge of film, 126-size, such as KODAK GOLD 200 Film for color prints
- 1 piece of thin black cardboard, 1 1/4 x 5 3/4 inches
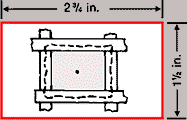
- 1 piece of rigid black cardboard, 1 1/2 x 2 3/4 inches, with a 1/2-inch-square opening cut in the center
- 1 piece of heavy aluminum foil, 1-inch square
- 1 piece of black paper, 1-inch square
- 2 strong rubber bands
- 1 No. 10 sewing needle, black masking tape a nickel or a dime
|
Assembling the Camera
1.
Measure and mark the large piece of black cardboard into four sections, each 1 7/16 inches wide.
|

|
2.
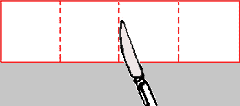
Using a knife, cut through only the top layer of cardboard along each of the lines. This will make it easier to fold the cardboard.
|
|
3.
Fold the cardboard into a box and tape the edges together with the black tape.
|

|
4.
Using only the point of the sewing needle, make a very tiny pinhole in the center of the aluminum foil. When you make the hole, rest the foil on a hard, flat surface.
|

|
5.
Center the pinhole in the foil over the square opening in the small piece of cardboard. Tape the foil to the cardboard on all four edges.
|
|
6.
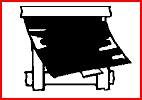
Put the small piece of black paper over the pinhole and tape it along the top edge. Use a small piece of tape at the bottom to hold it down between exposures. See alternate shutter section for a more light-tight shutter.
|
|
7.
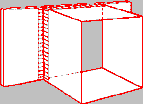
Tape the cardboard with the pinhole to the box. Use plenty of tape, and make sure all the edges are taped together so that no light can get into the camera box.
|
|
8.
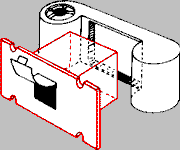
Put the camera box into the grooved recess in the square opening of the film cartridge. This should be a tight fit so that no light can get into the camera.
|
|
9.
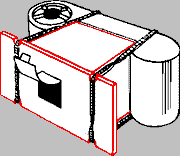
Use the two B rubber bands to hold the camera in place.
|
|
10.
Insert the edge of a nickel or dime in the round opening on the top of the film cartridge.
|

|
11.
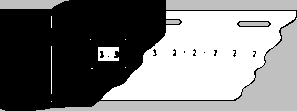
To advance the film in the cartridge, turn the coin counterclockwise. The yellow paper (visible in the small window on the label side of the film cartridge) should move. The film has borders and numbers printed on it. Turn the coin slowly until the third and fourth numbers in each series on the yellow paper show in the window. The film will then be in the proper position for picture-taking.
|
|
Alternate Shutter
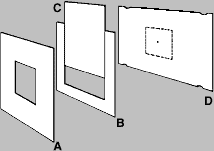 You can make a more light tight shutter using the diagram and instructions below.
1. Cut two 1 1/2-inch-square pieces of thin black cardboard. In one piece, cut a 1/2-inch square hole in the center (A). The other piece should be cut to leave a 1/4-inch border on 3 sides (B). This is your spacer.
2. Cut a 1 x 1 1/2-inch piece of thin black cardboard (C). This is your shutter, which should easily slide into and out of the spacer (B).
3. Tape or glue parts A, B, and D together. (Part D is the 2 3/4 x 1 1/2-inch piece of cardboard cut previously to make the lens.)
|
Taking a Picture
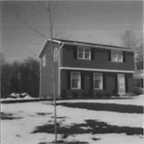 Your camera must be very still while you are taking a picture. Try taping your camera to a table, windowsill, chair, rock, or other rigid surface. Or you can use a lump of modeling clay to mount the camera firmly on a steady support, such as a kitchen stool. Aim your camera by sighting over the top surface.
A viewfinder for a pinhole camera, while usually not necessary, can be made of cardboard or wire. The larger frame should be slightly smaller than the film size, (about 1 inch square) and located directly above the pinhole at the front of the camera. The small frame is a sighting peephole directly above the film and squarely behind the center of the large frame.
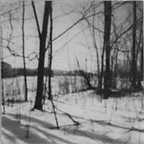 When you aim your camera at subjects closer than 5 feet, tip the camera up slightly to allow for parallax--the difference between the view you see through the viewfinder and the image recorded on the film. This effect is caused by the separation between the viewfinder and the pinhole.
To prevent light from entering your camera and spoiling the pictures, use the small piece of tape on the black paper to hold it down over the pinhole after each exposure. If you're using the alternate shutter, make sure the shutter is kept in the spacer between exposures.
The following table gives exposure recommendations for a cartridge pinhole camera. These recommendations are approximate. It's a good idea to make three different exposures for each scene to be sure you'll get a good picture. So take a picture at the recommended exposure time, one picture at twice the recommended time, and another one at one-half the time.
| Film | Bright Sun | Cloudy Bright |
| KODAK GOLD 200 | 1 1/2 Seconds | 7 seconds
|
|

